Adjustable power strip clamp mount by jaguo
Adjustable power strip clamp mount by jaguo
Clamp to mount power strips/boards under desks non-destructively (instead of using a mount that screws into the desk). Helps to organise computer cables, particularly for standing desks. Adjustable width to fit a variety of power strip sizes. Features: Fits desks up to: --- Regular size: 25 mm/1 inc...
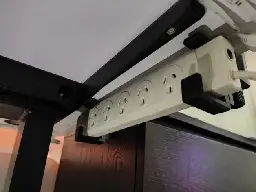
Clamp to mount power strips/boards under desks non-destructively (instead of using a mount that screws into the desk). Helps to organise computer cables, particularly for standing desks. Adjustable width to fit a variety of power strip sizes. Features: Fits desks up to: --- Regular size: 25 mm/1 inch thick --- Large size: 50 mm/2 inches thick Fits power strips 60 - 90 mm wide and 35 mm thick Mounts power strips in vertical orientation to reduce interference with desk frames (e.g. standing desks) Parts: Clamp, screw (large) and pad - main body that clamps to the desk Arm - adjustable lower portion of the power strip mounting area. Raise/lower to fit different power strip widths Screw and nut - fixes the arm in place. Nut fits into the hex nut groove of the arm Instructions: Pick the clamp size that fits your desk thickness Print two sets (1 of each part) to mount at both ends of your power strip. All parts are shared between the different clamp sizes Insert the nut into the groove in the arm Place the arm against the bottom of the clamp and pass the smaller screw through to the nut Pass the larger screw through the clamp Place the pad onto the ball joint of the larger screw. It should snap into place with some pressure Place the clamp onto the desk and tighten the larger screw until the clamp is snugly - against the desk. Be careful of overtightening as you may damage your desk surface Loosen the smaller screw and slide your power strip onto the arm. Push the arm up until the power strip fits snugly and tighten the smaller screw again Print settings: Print as orientated Layer height: 0.16 mm for smoother threads Walls: 2 is sufficient Infill: 15% adaptive cubic is sufficient Supports: not necessary, but may be needed for the hole in the clamp's powerboard mount area depending on your printer's bridging abilities (see picture). Easiest to use support blockers under the C clamp threads and let your slicer auto-generate supports for this hole Notes: I designed the mount to fit the variety of power strip sizes I had. If you have larger power strips (e.g. double row of sockets), feel free to let me know the width and depth so I can adjust the design to fit your use case Updates: Hex nut changed to square nut for easier tightening (reduced rotation) of the arm Hook added to top part of clamp to stop smaller power strips falling forwards and out Large version of clamp added for thicker desks - fits up to 50 mm/2 inch thickness
Check out the new magnetized ones by the LTT team. Actually awesome product that uses the key holes in the back and doesn't suck.