Search
Decky-Dictation plugin
So Decky-Dication is a really cool plugin that lets you use voice typing in game mode. The github is here, but unfortunately they were never able to get the plugin small enough for it to be in the Decky store, and the project has since been abandoned.
Luckily, the plugin still works really well. You can build it yourself from the github, or if you're trusting enough you can download an already built .zip file here.
Once you have the plugin file, unzip it on your deck, and move it to the homebrew/plugins folder. That folder is usually write protected, so you may need to move it using a terminal command (ie if you extracted the folder on the desktop, the command would be sudo mv ~/Desktop/decky-dication ~/homebrew/plugins. Then switch back to game mode and it should be in your plugin list.
Once the plugin is installed, you press steam+b+L2 to start speech to text, and then steam+b+r2 to disable it.
Steam Deck Hardware Guide - includes mods, hardware revisions, and more
Information and guides about Steam Deck hardware and modifications. This project isn't associated with Valve and modifying your device will / may void your warranty.

How to use adhoc wifi for playing LAN games between two decks without a network
First of all, this isn't my guide, so I may not be able to help if you have issues. The source for the guide was a reddit comment here.
Here's the guide:
Its been a while since I first went through getting LAN to work on the steam deck and i think i left a comment somewhere but if you want a more in depth tutorial let me know. Its a decent amount of work to get it running but afterwards you can start a local network / play with a friend in a game that supports LAN. It works in gaming mode too! Its as if it were stock. Heres a quick rundown
-
In desktop mode make sure to Install arch linux distro box with root access
-
Install yay and its dependencies to the distrobox as well as the git command
-
Install the create_ap dependencies from the create_ap github using the install git command (theres a newer fork but the older one worked for me)
Create a .sh file and put the following text inside (the export paths should be where distrobox was installed to- if the distrobox is somewhere else then the path would be different)
`!/bin/sh
export LD_PRELOAD= export
PATH=$PATH:$HOME/.local/bin export
PATH=$PATH:$HOME/.local/podman/bin export
PATH=$PATH:$HOME/.local/podman/lib/podman`
konsole —noclose -e /home/deck/.local/bin/distrobox enter —root Arch (or name of your distrobox) — sudo create_ap —daemon -g 10.10.10.1 (or desired ip address) —ieee80211n —ht_capab ‘[HT40+]’ -n wlan0 DeckHotspot (or name of your local hotspot) 11111111 (or password of your choosing)`
After you have the .sh file create another sh file called something like StopHotspot and put the following code inside
!/bin/sh
export LD_PRELOAD= export
PATH=$PATH:$HOME/.local/bin export
PATH=$PATH:$HOME/.local/podman/bin export
PATH=$PATH:$HOME/.local/podman/lib/podman
konsole -e /home/deck/.local/bin/distrobox stop —yes —root Arch (or name of your distrobox)
-
I cant remember exactly right now but i can look later if you need me to but after steamOS 3.5 the hotspot stopped working and i think it was fixed by adding something with dhcpv6 to the firewall settings (found the fix from a github comment)
-
Install Bash Shortcuts from the decky plugin store and direct your newly created shortcuts to your two sh files (one that starts hotspot and one that stops the hotspot)
All finished! You can now play LAN games offline with your own personal hotspot that can be controlled from gaming mode:) Keep in mind that doing this will cause the other persons deck to wig out when they try going into desktop mode if still connected to the hotspot, so i just remember to stop the hotspot whenever finished playing. The wifi will also not show until the hotspot is disconnected or if you power down the device and back on again. Also since the distrobox is created as a root it will ask you for a sudo password every time you launch the hotspot (unless youve managed to disable the sudo password which isnt recommended)
Sorry i know this isnt super in depth but like i said if its requested to do a more in depth tutorial i can. Its fun being able to play LAN hotspot straight from the deck though! Hope you enjoy!!
EDIT: I found the other comment i made. I added the fix for steamOS 3.5 in this comment as well. Also the konsole window displayed error messages when launching the hotspot but by adding the first line in the code above ^ fixed that issue for me. Let me know if you have any questions!
How to import your demo save data into Metaphor: ReFantizio
Just ran into this problem, and thought I would share the solution for others.
Metaphor: ReFantizio is the new Atlus RPG, and it has a pretty lengthy demo where your progress carries over to the main game. However, this doesn't work on steam deck because each windows game has it's own pretend file system for files, and the full game can't find where the demo saves are. This is an issue with other games that have demos as well, but the file paths will be different depending on the game ID and the save location.
To fix it do this:
- Go to desktop mode
- In the file explorer, enable show hidden files (three bar menu in upper right)
- In the file explorer, navigate to
/home/deck/.steam/steam/steamapps/compatdata/3130330/pfx/drive_c/users/steamuser/AppData/Roaming/' and copy the folder namedSEGA` - Now go to
/home/deck/.steam/steam/steamapps/compatdata/2679460/pfx/drive_c/users/steamuser/AppData/Roaming/and paste thatSEGAfolder. - Now relaunch the full Metaphor: ReFantizio game and select new game. It should tell you it found demo save files and that you can import them.
If you have any questions let me know. The same solution should work for other demo>full game save transfers, but the Steam ID number in the file paths will change, and possibly the save file location as well.
Edit: Much later, I realized that Atlus actually provided a guide for this as well: https://store.steampowered.com/news/app/2679460/view/4518890760248770930?l=english
Could have saved me some time with troubleshooting, but oh well. I appreciate that they specifically offered advice to Deck users.
How to use Thunderstore mods on Steam Deck for Unity games like Lethal Company
I probably should have posted this earlier back when Lethal Company was more popular, but better late than never.
For installing mods, you first need to go to desktop mode and download r2modmanPlus. You specifically want the r2modman-x.x.xx.AppImage file from the release page. You can run this app image in desktop mode to access the mod loader, and install mods for the different supported unity games. After downloading the mods you want through the built in downloader, you can click "Start Modded" in the upper left corner to start the game. It will open steam and run the game with the mods. You will usually see a command prompt window open before the game does, this both lets you know the mods are enabled and will let you see if there are any errors with the mods running.
After you've confirmed the game will run with mods in desktop mode, the next step is to get mods working in game mode. In R2modman, open the settings menu at the bottom, and look for an option that says "launch options". This will say something like --doorstop-enable true --doorstop-target "Z:/home/deck/.config/r2modmanPlus-local/LethalCompany/profiles/Default/BepInEx/core/BepInEx.Preloader.dll" -r2profile "Default". You want to copy this command, and then go to steam game properties for the game you're running and paste these launch options into the launch arguments box. If you have trouble copying the command, you may need to connect a keyboard or bind "ctrl + sub command c" to one of the deck's back buttons. Now the game should run with mods in game mode.
Troubleshooting:
If you have any trouble and the game is installed to a microsd card, you may need to move it to your internal SSD.
Sometimes the resolution of games will get messed up being launched with mods this way. Here are some suggestions if you get weird resolution scaling:
- In steam game properties, set the resolution from automatic to 1280x800.
Alternative resolution fix:
-
Launch game in desktop from mod manager
-
Open settings
-
set display mode to "Window"
-
From desktop, click top bar of window Lethal Company is running in, then right-click
-
From drop down select "Maximize". Resolution should now be scaled to native.
-
In game settings, select "Windowed Fullscreen", everything should work now without window borders.
This guide was largely written from memory, so I may have left out some helpful details. If you notice anything missing or have any issues let me know and I'll try to update it.
Pull out Dolphin's menu during emulation.
Been tinkering with Wii emulation and found that most posts about how to access Dolphin's menu in game mode are too complex. So I decided to make a post about a simpler method I discovered.
[Assumptions] I'm using EmuDeck to set everything up and accessing the game through game mode. (Steam game Icons set up by Steam ROM manager). _____________________________________ [How To]
-
So first , go to the game's page and click on the "gear" icon. Then click on "properties".
-
In launch options, delete the -b in org.DolphinEmu.dolphin-emu -b -e (The -b prevents Dolphin's menu to be created in the first place)
-
Launch the game, then press the steam button. You will see a second window under the "Switch windows" section. Choose the second one, and you will see Dolphin's menu.
-
(Edit: There are better navigation solutions in the comments!)
In order to navigate it, change controller config to "Web Browser" presetClick on settings you wish to adjust. All the tabs you open in Dolphin menu will also show up under "Switch windows" too. -
After you finish adjusting stuff. Simply close the tabs you opened and switch back to the tab that the game is on.
___________________________ Hope this help people who stumble across this post!
Emudeck and other Emulators on the Steam Deck
I've installed Emudeck on my device, the process was really easy to follow, here's a guide.
I just made this post to share info and suggestions on the best games to try. Right now I'm playing a (totally owned) rom of Zelda breath of the wild and so far is flawless (although stuck to 30 fps x some reason). Any suggestion for other good game??
Controller doesn't work all the time. For whatever strange reason.
This is if you controller is working fine in the Steam menu once you wake your Steam Deck but unresponsive in the game you was playing.
Press the Steam button, click on the game up the top and go into "Controller Settings", you should see up the very top of the screen, your controller name and "Steam Deck", just under that to the right, you will see "Reorder Controls". Select that and change your controller to "2", so "Steam Deck" Controller is now "1".
This should now let the controller work in game again. I have seen no issue so far playing as controller "2" for this fix. And it sure beats closing the game in case you lose data.
From Reddit but a very useful tidbit
Fixing co-op in Halo MCC between Windows and Linux/Steam Deck machines (also fixes Company of Heros 3 and possibly some other games)
I originally posted this guide on reddit, but wanted to repost it here as part of migrating away. Some games, including Halo MCC Coop and Company of Heros 3, will desync during multiplayer. This can be fixed by manually syncing two files.
Thanks to this comment by Fractal on ProtonDB for showing me the way.
The issue is non-matching ucrtbase.dll files between the two computers. There are two different copies of the file, both in the system32 and syswow64 folders (note: each copy is unique, you need to copy two separate files with the same name from different folders). It sounds like these files are supposed to be automatically synced for coop, but they aren't (possibly for legal reasons) and it causes problems with desync.
To fix it, you need to take copies of your friend's windows versions of the files, and copy them into the compdata folder for Halo on your deck. After that you should be able to play without desync.
The specific steps to follow are:
-
On the windows machine, go to:
C:\Windows\System32\ucrtbase.dlland copy the file. -
Send it to the linux machine. Some software (like Discord) can compress or straight up change the file. I found I could safely send the files through discord if I put them in a .zip file first. If in doubt (or if things don't work) you'll need to verify the checksums (md5/sha256 etc).
-
On your linux system, replace the symlinked file in your steamapps folder. Once you're in your steamapps folder, the file will be located at:
steamapps/compatdata/976730/pfx/drive_c/windows/system32/ucrtbase.dllThe location on the steam folder can be different depending on how steam is installed, on steam deck you'll usually find it in the hidden folder.steam/steaminside your home folder. You'll need to enable the option to show hidden folders before it will show up, this option can be found in the menu in the upper right of the file explorer. -
Repeat the process, but this time get the file from
C:\Windows\SysWOW64\ucrtbase.dll. Once you have it safely on the linux machine, put it in the steamapps folder atsteamapps/compatdata/976730/pfx/drive_c/windows/syswow64/ucrtbase.dll
After this start both games in anti-cheat disabled mode, and coop should now work.
If the linux/steam deck version of the game won't start at all, it means something is wrong with the ucrtbase.dll files. They either got corrupted/changed during transfer, you mixed up which one was from the system32 folder and which was from the syswow64 folder, or you accidentally put the same file in both of those folders.
Either way, I'd recommend checking the checksums of the files on both machines to figure out which (or both) files got messed up in transfer.
Here's a guide on checksums for windows, it will require either 3rd party software or using the windows command line. On linux, KDE has checksums built into the file explorer, just right click on the file and hit properties. On other DE enviroments you can usually just run md5sum <file> or sha256sum <file>
How to use your Deck as a Steam Input controller for your PC (Without Steam Link!)
I just had to do this myself and found this handy guide on reddit created about a year ago. So I don't claim credit, but I wouldn't want such useful content to be available only on reddit, so I'll share it over here:
Credit goes to /u/walllable.
Original POST:
Title's pretty self explanatory I think! This will be using VirtualHere, a program that connects one computer's USB devices to another computer via Wi-Fi, and will also let you access this functionality via Game Mode, so you don't have to go into the desktop in order to do this. This might use less battery power than controlling your PC via Steam Link as well since the Deck doesn't have to decode a video/audio stream and all that. This involves installing the program on both your Deck, and on your PC. I'll be providing instructions for both.
Skip step 1 if you've already set the desktop deck account's password. If you don't know if you have or not, go ahead and follow it.
-
Go into desktop mode (Open the Steam Menu, go to Power, select "Switch to Desktop,") open System Settings, and go to the Users section, then click "Change Password." Set it to whatever you'd like, though ideally something easy to type with the On-Screen Keyboard, since you'll be typing it every time you want to use the Deck as a controller.
-
Open the file browser, and make a folder in the Documents folder named "virtualhere" (all lowercase, no quotes)
-
Download the VirtualHere Linux Server. The specific one you'll want is "VirtualHere USB Server for Linux (x86_64)," under "Generic VirtualHere USB Server Builds"
-
Save the file you're downloading to the virtualhere folder you made in your documents earlier.
-
In the file browser, right click on the "vhusbdx86_64" file that you downloaded, and click on "Properties." In the window that opens, go to the "Permissions" tab and tick the "Is executable" checkbox.
-
Open Steam on your desktop, and click "Add a Game" on the bottom left corner, then click "Add Non-Steam Game." (You can add pretty much whatever application you want for this step, it doesn't matter much since we'll be changing all of its settings later anyway.)
-
Find the application you just added in your list of games, right-click it, then click "Properties"
-
Replace whatever text is in "Target" with env, whatever's in "Start in" with "./" (with quotes,) and "Launch options" with -u LD_PRELOAD konsole --fullscreen --notransparency --hold -e sudo /home/deck/Documents/virtualhere/vhusbdx86_64 You can also change the name of the application and set an icon, if you'd like (I set mine to "PC Controller.) The end result should look like this.
-
Close the Properties window, and go ahead and launch it from Steam, then enter the password that you set earlier (The terminal not showing any changes as you type is normal.) If you see text that says VirtualHere USB Server is running...press CTRL-C to stop then you're all set on the Deck side of things!
You can now exit Desktop Mode, and go back into Game Mode on your deck, we're pretty much done here.
Now let's get the PC side of things set up, this won't take as many steps as getting it set up on the Deck.
-
Download the VirtualHere Client for your respective platform. In my case I'm on Windows, but the process should be pretty similar for other platforms? I'm not sure about Linux, but assume if you're using Linux you probably know what to do.
-
Open the file that you just downloaded, you should see a window like this pop up.
-
Open the application you added on your Deck, and enter your password with the On-Screen Keyboard (Old down the Steam button, and press the X button to bring it up.)
-
Once you've done that, the window on your desktop should have its list populated like this. If not, try double-clicking on the "USB Hubs" text in the window. That seems to help it appear faster for me, I think?
-
Double-click on the "Steam Controller" entry, and you should hear a noise indicating a USB device got connected, and a popup similar to this from Steam in the bottom-right corner.
And you should be all set! Your Deck will now behave like a Steam Controller does, including being able to do stuff on the desktop, per-game bindings (that use your custom bindings from your Deck if you've got any set up!) and gyro functionality.
To disconnect the Deck from your PC, show the VirtualHere window from the status section thing on your taskbar, and just double-click on the Steam Controller entry again. You should hear Windows' "USB Disconnect" sound, and regain control on the Deck itself so you can exit the application.
Some notes that I think can be handy:
-
If you don't regain control on your Deck after exiting VirtualHere, don't worry, this isn't permanent! Just hold down the power button on the top, and select "Restart." Once the Deck's back up and running, you should be all good.
-
If you're having problems with latency or the connection dropping out, try connecting your Deck to the 5ghz band of your router (Or the 2.4ghz band if 5 ghz is screwing you over!)
-
Lowering the screen brightness on your Deck before you connect it to your PC will help your battery last longer, if you plan on using it for an extended period of time.
Hopefully Valve adds this as native functionality someday, but until then I've really been liking this, since I don't really have any other controllers to use other than a Steam Controller, and I figured "Well, I paid $400 for this thing with a good controller in it, I might as well use it for my PC." Hope this guide came in handy!
Playing Minecraft on the SteamDeck, handheld mode
Minecraft does not natively support the SteamDeck controller. However, mods are always here to save the day.
I recommend using PrismLauncher to launch the game. It has first class modding support, and is just easier to use with modding than the official launcher.
Steam Button > Power > Switch to Desktop
This will switch you to desktop mode. Once desktop mode has loaded, click the steam deck logo in the bottom left of the screen to open the "start menu".
Steam Button + x to load the keyboard, and search for "Discover", clicking it once it has been found.
In Discover, use the keyboard again to search for "Prism Launcher", and when it has been found, install it. Should take a minute or two.
You should now be able to find Prism Launcher in the "start menu". If you cannot, restart the deck, and re-enter desktop mode afterwards.
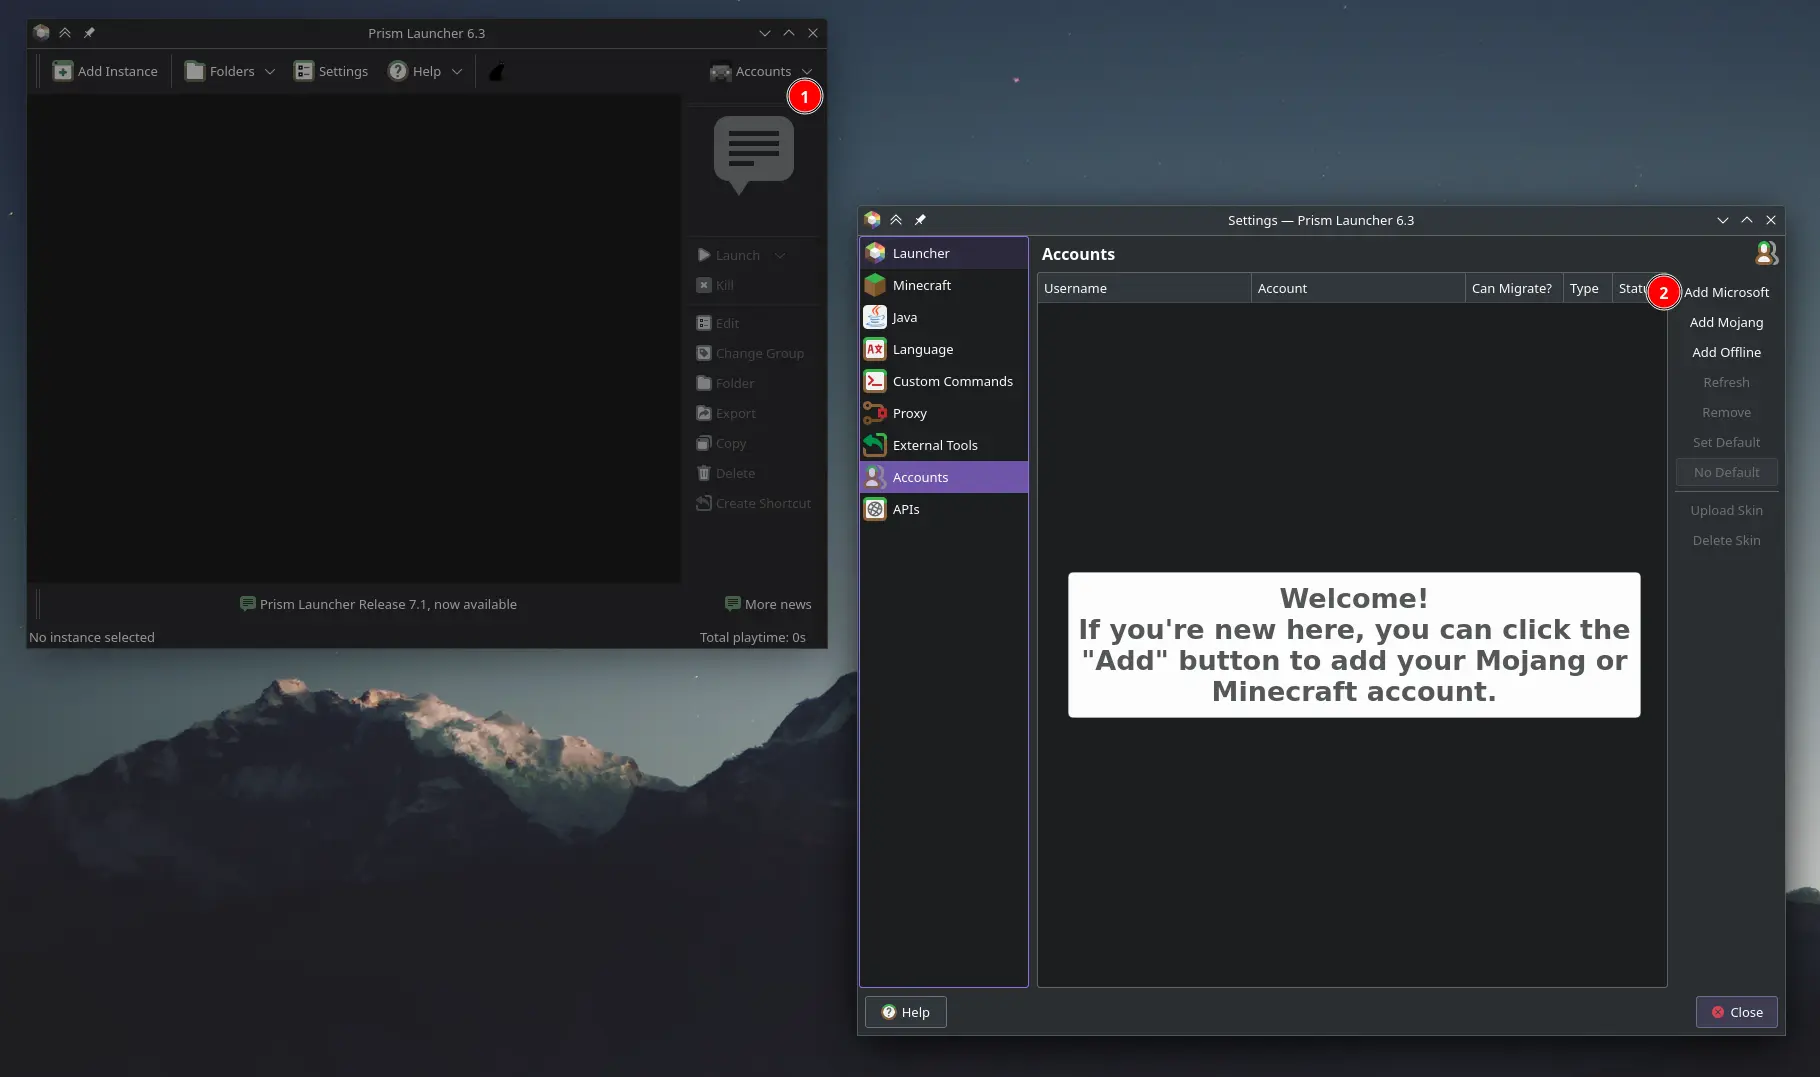
Launch Prism Launcher, it should get you to configure language etc first. If it asks you to select a Java version, select "17" (or whatever the highest is).
Click on accounts (1) and manage accounts. It will open the account manager screen. Add a Microsoft account (2) (or Mojang, if you haven't migrated), and follow its sign in steps.
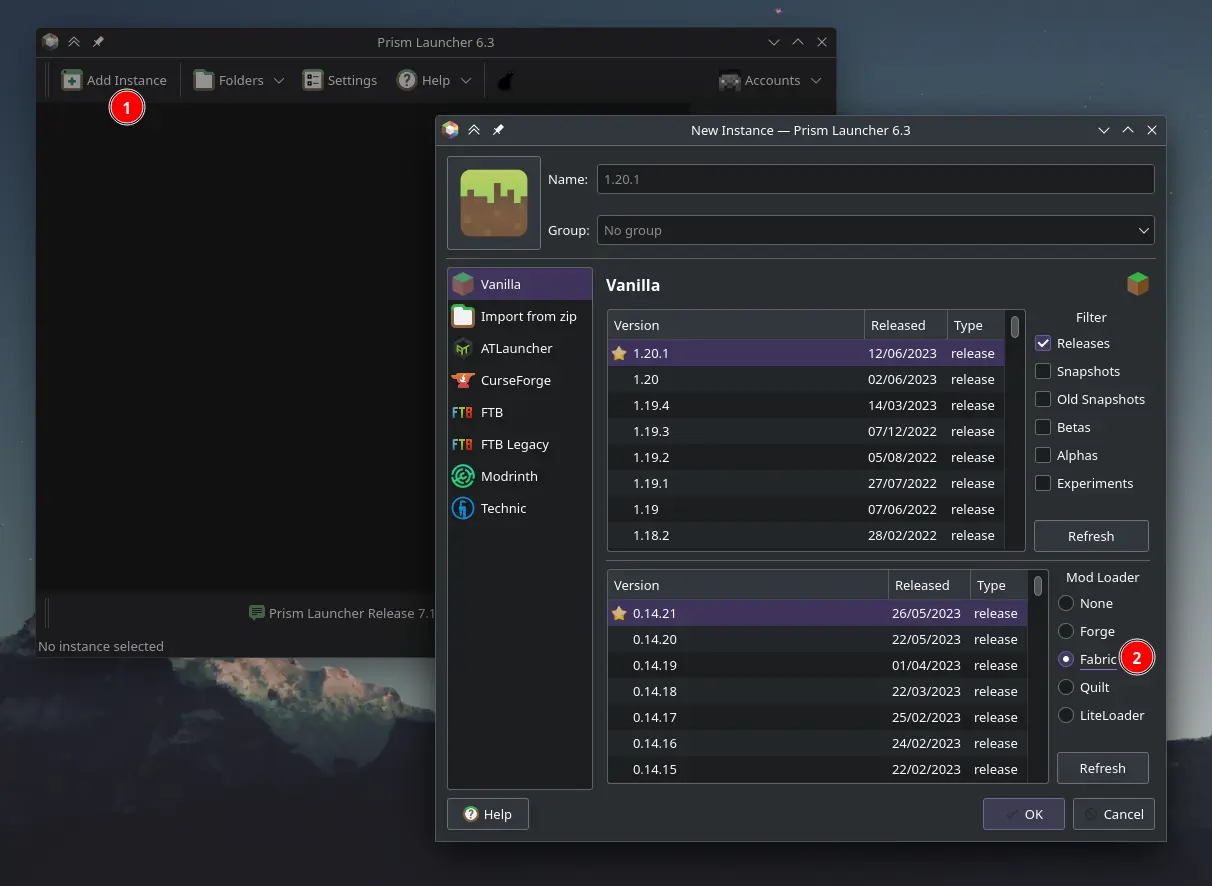
When you have signed in, you can create a new instance. There is a large "Add Instance" button. Click it. It will open the new instance dialog.
Make sure to select Fabric (2). Going with the default (starred) options should be good. Then press OK, which should create the instance for you.
Right click on the new instance you just made, and select "Edit Instance" (1).
Switch to the "Mods" tab, and click "Download Mods" (2).
Under the Modrinth tab, search for "Fabric API" and "Midnight Controls". Select each for download, then click "Review and Confirm", then "OK". It should install the mods for you.
You can now launch the instance. It should launch into the game. All going well, you should now be able to play the game entirely with the controller.
You can change controller settings in game by going:
Options > Controls then clicking the controller icon next to Key Binds.