Linux
- www.linode.com Mount an SMB Share in Linux
Learn how to mount a Windows directory in Linux using the SMB Protocol. This enables you to remotely access and modify you files.

source ***
Mount an SMB Share in Linux |
Linode Docs Determining how to share files and directories between computers is a common problem — one that has many different solutions. Some of these solutions include file transfer protocols (like SFTP), cloud storage services, and distributed file system protocols (like NFS and SMB). Figuring out what solution is right for your use case can be confusing, especially if you do not know the correct terminology, techniques, or the tools that are available. Sharing files can be made even more complicated if you intend to do so over the internet or use multiple operating systems (like Linux, Windows, and macOS).
This guide covers the Server Message Block (SMB) protocol. Specifically, it discusses using the SMB protocol to mount a Windows SMB share (a shared directory) to a Linux system. By following this guide, you will be able to access all of your files within a Windows folder (such as
C:\My_Files) on your Linux system at whichever directory you choose as a mount point (such as/mnt/my_files). This method of file sharing is appropriate when you need to access entire Windows directories remotely as if they were local resources. In most cases, SMB is a native (or easily installed) file sharing solution for users that need access to the same directory and is commonly shared through a corporate intranet or the same private network.Note
Network File System (NFS) is another distributed file system protocol that’s similar to SMB. While SMB is more commonly used in primarily Windows environments and NFS is used in primary Linux environments, both have cross-platform support. This guide does not cover NFS, but you can learn more about it by reading through our NFS guides. If you are not in a Windows environment and are looking to share directories between Linux systems, consider using NFS.
Warning
While security and performance of the SMB protocol has improved over time, it is often still a concern when connecting to an SMB share over the internet. This is typically not recommended unless you are using SMB over QUIC (recently introduced on Windows 11 and Windows Server 2022), intend to always use the latest protocol version (3.1.1 as of this writing), or are connected through a personal or corporate VPN. If you are not able to implement these recommendations and still wish to share files over the internet, consider if the SFTP protocol would work for you instead.
Overview of the SMB Protocol -------------------------------------------------------------
The SMB protocol provides the ability to share entire directories and printers between multiple machines over a network (typically a private network). It is widely used in Windows environments due to its relative simplicity (for system administrators), built-in Windows support, and extensive Linux support (basic support is also included in recent Linux kernels).
SMB Versions
To understand SMB and some of the related terminology (specifically CIFS), it’s helpful to know a little about the history of the protocol:
-
SMB1: (1983+) While Microsoft is the developer and maintainer of SMB, it was originally designed at IBM. Microsoft modified that original design and implemented the “SMB 1.0/CIFS Server” as part of their LAN Manager OS and, eventually, in Windows. Version 1 of the protocol has been discontinued (as of 2013) and is no longer installed on modern Windows systems. There are many security and performance issues with SMB1 that make it largely unfit for use today.
-
CIFS: (1996) Microsoft attempted to rename SMB to CIFS (Common Internet File System) as it continued to develop features for it, including adding support for the TCP protocol. While the name was retired in subsequent versions, the term still appears in various tooling and documentation as it was in use for over 10 years.
-
SMB2: (2006) Version 2 introduced huge performance benefits as it greatly reduced the amount of requests sent between machines and expanded the size of data/storage fields (from 16-bit to 32-bit and 64-bit). It was released alongside Windows Vista. Even though SMB2 (and all SMB versions) remained a proprietary protocol, Microsoft released the specifications for it so that other services (like Linux ports) could provide interoperability with this new version.
-
SMB3: (2012) Version 3 was released alongside Windows 8 and brought extensive updates to security (including end-to-end encryption) and performance. Additional updates were released with Windows 8.1 (SMB 3.0.2) and Windows 10 (3.1.1). When using the SMB protocol today, always use the latest version — unless you are supporting legacy systems and have no other choice.
For a more comprehensive version history of SMB, review the Server Message Block > History Wikipedia entry.
Linux SMB Support
-
Samba: Unix support for the SMB protocol was initially provided by Samba. Since Microsoft initially did not release public specifications for their proprietary protocol, the developers of Samba had to reverse engineer it. Future versions of Samba were able to use the public specifications of later SMB protocols. Samba includes support for SMB3 (3.1.1) and is actively updated. Samba provides extensive support for all features of the SMB protocol and acts as a stand-alone file and print server. For more background information, see the Samba Wikipedia entry.
-
LinuxCIFS utils: This in-kernel software acts as an SMB client and is the preferred method of mounting existing SMB shares on Linux. It was originally included as part of the Samba software, but is now available on its own. LinuxCIFS utils, available as the cifs\_utils package in most Linux distributions, is used within this guide.
-
ksmbd: Developed as an in-kernel SMB server in cooperation with the Samba project, ksmbd is designed to be a more performant fileserver. It doesn’t implement all of Samba’s extensive features (beyond file sharing).
Before You Begin -------------------------------------
-
Obtain the necessary information required to access an existing SMB share, including the IP address of the SMB server and the path of the share. If you do not have a share, you can create a local directory using the
mkdircommand and then create a Samba share for that location. Access to an existing SMB share on a Windows or Linux machine. Creating an SMB share is beyond the scope of this tutorial. -
Have access to an Ubuntu or Debian Linux system where you intend to access your SMB share.
Installation -----------------------------
The LinuxCIFS utils package provides the tools needed to connect to a share and manage mounts on a Linux system. You use it to help create and manage a connection to a Windows, macOS, or Linux share.
-
Update the list of available packages using the below command:
sudo apt update && sudo apt upgrade -
Install the both the LinuxCIFS utils package (needed to mount SMB shares) and the psmisc package (needed to gain access to the
fusercommand, which shows you which users are using the various mounts on your server).sudo apt install cifs-utils psmisc -
Verify that LinuxCIFS is available using the following command:
No error or output message is expected as there are no CIFS connections set up yet.
-
Verify that you have access to the
fusercommand.This command shows a list of the various command line switches that can be used with the
fuserutility.Usage: fuser [-fMuvw] [-a|-s] [-4|-6] [-c|-m|-n space] [-k [-i] [-s sig] | -SIGNAL] NAME...
All files in Linux are accessible on a single giant hierarchical directory tree, which starts at the root (
/). The mount command (used in this tutorial) enables you to access other storage devices or file systems from that same tree. These other storage resources do not have to be physical disks and they do not have to be using the same file system. To learn more about the mount command, review the following guides:The following sections detail how to mount an SMB share on Ubuntu, but the essential process is the same for other Linux distributions.
-
Create an empty directory to be used as the mount point. This directory can be located wherever you wish, though it’s common to use the
/mntdirectory. -
Enter the following command to mount the SMB share, replacing \[server-ip\] with the IP address of your SMB server, \[share-path\] with the file path to your SMB share on that server, and \[mount-point\] with the new directory you just created.
mount -t cifs //[server-ip]/[share-path] /[mount-point]In the example below, the SMB server’s IP is 192.0.2.17, the share’s path is SharedFiles, and the mount point is /mnt/smb\_share.
mount -t cifs //192.0.2.17/SharedFiles /mnt/smb_share -
When prompted, enter the password to connect to the remote share.
-
If the connection is successful, you should see the remote share mounted on the mount point directory you created. To verify this, type the following command:
The command above lists all mounted SMB shares. Among this list, you should see the share you just mounted.
-
You should now be able to access the files as if they were on a local drive. In the command below, replace \[mount-point\] with the directory you have created (such as
/mnt/smb_share).From here, you can run the
lscommand to view your files and you can interact with the files as you would any other files on your system.
Create a Credentials File -------------------------------------------------------
You don’t want to have to type in your credentials every time you access a share. On the other hand, putting the credentials where everyone can see is not a good idea. The following steps help you create a credentials file to automate the process of logging in.
-
Use your preferred text editor such as vi or nano to create a file to store the credentials. You can name the file anything you want, but using a period before the filename will hide it from view. For example, you can create a file named
.credentialsusing the following command: -
Add the necessary credentials to the file in the following format:
File: .credentials
If the
domainis not required (except on Windows systems), you can omit that entry. Replace thetarget_user_nameandtarget_user_passwordwith the actual credentials you need to use to access the SMB share. Save and close the file. -
Set ownership of the credentials file to the current user by running the following command:
sudo chown :Replace
with your username andwith the name of your credentials file. -
Set the file permissions to
600to ensure that only the owner has read and write access:sudo chmod 600 -
To mount the share using the credentials file, run the following command:
sudo mount -t cifs -o credentials= /// /Replace
with the IP address of the server hosting the share,with the name of the share you want to mount, and `` with the local mount point where you want to access the share. You aren’t asked for credentials this time because mount uses the credentials file instead. -
Verify that the share has been successfully mounted using the following command:
This should show you the share information as output, confirming that the share has been successfully mounted using the credentials file.
Remounting the SMB share every time you restart the server can be tedious. You can instead set your server up to automatically remount the share every time you restart it using the following steps. Before starting these steps, make sure that the share is currently unmounted.
-
Open the
/etc/fstabfile in your preferred text editor. This file contains configurations that the server uses on reboot to reconnect to shares (among other things). There are columns for the file system, mount point, type, and options. -
Enter the information below in each of the columns:
File: /etc/fstab
From the file above, replace
with the IP address of the server hosting the share,with the name of the share you want to mount,with the local mount point where you want to access the share,with the name of your credentials file, -
Save the file so the share is available next time you reboot the server.
-
Verify that the share is mounted correctly using the `` as an identifier because the mount is reading the
/etc/fstabfile.
You may need to unmount a share at some point. To unmount an SMB share that has been mounted using the
mountcommand, you can use theumountcommand followed by the mount point of the share. The correct command isumount, notunmount.So to unmount an SMB share at the mount point ``, run the following command:
umount -t cifs /The share should not appear in the output of this command.
Conclusion -------------------------
You now have an understanding of SMB (and CIFS), what an SMB share is, and what a mount point is. These pieces of information allow you to share remote data in a way that’s transparent to users. From the user’s perspective, the resource is local to the server that they’re accessing. This guide also shows you how to use the mount and umount commands in a basic way to create and delete shares, how to create and use a credentials file to automate the sharing process to some extent, and how to automatically remount the share after a reboot.
More Information ----------------
You may wish to consult the following resources for additional information on this topic. While these are provided in the hope that they will be useful, please note that we cannot vouch for the accuracy or timeliness of externally hosted materials.
This page was originally published on Tuesday, June 6, 2023.
-
-
A Beginners Guide To Cron Jobs
ostechnix.com A Beginners Guide To Cron Jobs - OSTechNixThis guide explains the basic usage of Cron Jobs in Linux. It also discusses about crontab syntax generators and crontab graphical frontends.

source ***
A Beginners Guide To Cron Jobs - OSTechNix
Cron is one of the most useful utility that you can find in any Linux and Unix-like operating system. Cron is used to schedule commands at a specific time. These scheduled commands or tasks are known as "Cron Jobs". Cron is generally used for running scheduled backups, monitoring disk space, deleting files (for example log files) periodically which are no longer required, running system maintenance tasks and a lot more. In this Cron jobs tutorial, we will see the basic usage of Cron Jobs in Linux with examples.
1\. The Beginners Guide To Cron Jobs ------------------------------------
The typical format of a cron job is:
Minute(0-59) Hour(0-24) Day_of_month(1-31) Month(1-12) Day_of_week(0-6) Command_to_executeJust memorize the cron job format or print the following illustration and keep it in your desk.
~ ~ ~ ~ Cron job format~ ~ ~ ~
In the above picture, the asterisks refers the specific blocks of time.
To display the contents of the crontab file of the currently logged in user:
$ crontab -lTo edit the current user's cron jobs, do:
$ crontab -eIf it is the first time, you will be asked to choose an editor to edit the cron jobs.
``` no crontab for sk - using an empty one
Select an editor. To change later, run 'select-editor'.
- /bin/nano <---- easiest
- /usr/bin/vim.basic
- /usr/bin/vim.tiny
- /bin/ed
Choose 1-4 [1]: ```
Choose any one that suits you. Here it is how a sample crontab file looks like.
~ ~ ~ ~ crontab file~ ~ ~ ~
In this file, you need to add your cron jobs one by one.
By default, cron jobs run under the user account that created them. However, you can specify a different user by editing the crontab for that user. To edit the crontab of a different user, for example
ostechnix, do:$ sudo crontab -u ostechnix -e1.1. Cron Jobs tutorial
Here is the list of most commonly used cron job commands with examples. I have also included the detailed explanation for each cron job expression.
1. To run a cron job at every minute, the format should be like below.
```
```
This cron job is scheduled to run every minute, every hour, every day, every month, and every day of the week. For example if the time now is 10:00, the next job will run at 10:01, 10:02, 10:03 and so on.
Explanation:
Here is the breakdown of the above cron expression.
The asterisks (\*) in each field represent a wildcard, meaning "any value". So, in this case:
- The first asterisk (\*) represents any minute (0-59).
- The second asterisk (\*) represents any hour (0-23).
- The third asterisk (\*) represents any day of the month (1-31).
- The fourth asterisk (\*) represents any month (1-12).
- The fifth asterisk (\*) represents any day of the week (0-7).
- The `` represents the actual command that will be executed every minute.
Please note that running a command every minute can have resource implications and should be used with caution. It's important to ensure that the command you specify is appropriate for frequent execution and does not overload your system.
2. To run cron job at every 5th minute, add the following in your crontab file.
*/5 * * * *This cron job is scheduled to run every 5 minutes. For example if the time is 10:00, the next job will run at 10:05, 10:10, 10:15 and so on.
Explanation:
Here's how to interpret the cron expression:
- The
*/5in the first field represents a step value, indicating that the cron job will run every 5 minutes. It matches all values that are divisible evenly by 5 (e.g., 0, 5, 10, 15, 20, etc.). - The second asterisk (\*) represents any hour of the day (0-23).
- The third asterisk (\*) represents any day of the month (1-31).
- The fourth asterisk (\*) represents any month (1-12).
- The fifth asterisk (\*) represents any day of the week (0-7).
- The `` represents the actual command that will be executed every 5 minutes.
So, this cron job will run the specified `` every 5 minutes, continuously throughout the day and month, regardless of the specific date or time.
Please keep in mind that running a command at such frequent intervals can generate a high volume of executions. Ensure that the command is suitable for such frequent execution and that it won't overload your system or cause unintended side effects.
3. To run a cron job at every quarter hour (i.e every 15th minute), add this:
*/15 * * * *For example if the time is 10:00, the next job will run at 10:15, 10:30, 10:45 and so on.
Explanation:
The cron job
*/15 * * * *is scheduled to run every 15 minutes.Let's break down the cron expression:
- The
*/15in the first field represents a step value, indicating that the cron job will run every 15 minutes. It matches all values that are divisible evenly by 15 (e.g., 0, 15, 30, 45, etc.). - The second asterisk (\*) represents any hour of the day (0-23).
- The third asterisk (\*) represents any day of the month (1-31).
- The fourth asterisk (\*) represents any month (1-12).
- The fifth asterisk (\*) represents any day of the week (0-7).
- The `` represents the actual command that will be executed every 15 minutes.
Therefore, this cron job will run the specified command every 15 minutes, throughout the day and month, regardless of the specific date or time.
4. To run a cron job every hour at minute 30:
30 * * * *For example if the time is 10:00, the next job will run at 10:30, 11:30, 12:30 and so on.
Explanation:
The cron job
30 * * * *is scheduled to run at 30 minutes past every hour.Let's break down the cron expression:
- The
30in the first field represents the specific minute when the cron job will run. In this case, it's set to 30, so the cron job will execute at 30 minutes past the hour. - The second asterisk (\*) represents any hour of the day (0-23).
- The third asterisk (\*) represents any day of the month (1-31).
- The fourth asterisk (\*) represents any month (1-12).
- The fifth asterisk (\*) represents any day of the week (0-7).
- The `` represents the actual command that will be executed at 30 minutes past every hour.
Therefore, this cron job will run the specified command once an hour, specifically at the 30-minute mark. It will execute at 30 minutes past every hour throughout the day and month, regardless of the specific date or day of the week.
Please note that the cron job will not run continuously every minute. Instead, it will run once per hour, always at 30 minutes past the hour.
5. You can also define multiple time intervals separated by commas. For example, the following cron job will run three times every hour, at minute 0, 5 and 10:
0,5,10 * * * *Explanation:
The cron job
0,5,10 * * * *is scheduled to run at the 0th, 5th, and 10th minute of every hour.Let's break down the cron expression:
- The
0,5,10in the first field represents the specific minutes when the cron job will run. In this case, it's set to 0, 5, and 10. The cron job will execute at the 0th, 5th, and 10th minute of every hour. - The second asterisk (\*) represents any hour of the day (0-23).
- The third asterisk (\*) represents any day of the month (1-31).
- The fourth asterisk (\*) represents any month (1-12).
- The fifth asterisk (\*) represents any day of the week (0-7).
- The `` represents the actual command that will be executed at the specified minutes.
Therefore, this cron job will run the specified command multiple times within each hour. It will execute at the 0th, 5th, and 10th minute of every hour throughout the day and month, regardless of the specific date or day of the week.
Please note that the cron job will execute only at the specified minutes and not continuously throughout the hour.
6. Run a cron job every half hour i.e at every 30th minute:
*/30 * * * *For example if the time is now 10:00, the next job will run at 10:30, 11:00, 11:30 and so on.
Explanation:
The cron job
*/30 * * * *is scheduled to run every 30 minutes.Here's how to interpret the cron expression:
- The
*/30in the first field represents a step value, indicating that the cron job will run every 30 minutes. It matches all values that are divisible evenly by 30 (e.g., 0, 30). - The second asterisk (\*) represents any hour of the day (0-23).
- The third asterisk (\*) represents any day of the month (1-31).
- The fourth asterisk (\*) represents any month (1-12).
- The fifth asterisk (\*) represents any day of the week (0-7).
- The `` represents the actual command that will be executed every 30 minutes.
Therefore, this cron job will run the specified command every 30 minutes, throughout the day and month, regardless of the specific date or time.
7. Run a job every hour (at minute 0):
0 * * * *For example if the time is now 10:00, the next job will run at 11:00, 12:00, 13:00 and so on.
Explanation:
The cron job
0 * * * *is scheduled to run at the 0th minute of every hour.Here's how to interpret the cron expression:
- The
0in the first field represents the specific minute when the cron job will run. In this case, it's set to 0, so the cron job will execute at the start of every hour. - The second asterisk (\*) represents any hour of the day (0-23).
- The third asterisk (\*) represents any day of the month (1-31).
- The fourth asterisk (\*) represents any month (1-12).
- The fifth asterisk (\*) represents any day of the week (0-7).
- The `` represents the actual command that will be executed at the 0th minute of every hour.
Therefore, this cron job will run the specified command once per hour, specifically at the start of each hour. It will execute at the 0th minute of every hour throughout the day and month, regardless of the specific date or day of the week.
Please note that the cron job will not run continuously every minute. Instead, it will run once per hour, precisely at the 0th minute.
8. Run a job every 2 hours:
0 */2 * * *For example if the time is now 10:00, the next job will run at 12:00.
Explanation:
The cron job
0 */2 * * *is scheduled to run at the 0th minute of every other hour.Here's how to interpret the cron expression:
- The
0in the first field represents the specific minute when the cron job will run. In this case, it's set to 0, so the cron job will execute at the start of every hour. - The
*/2in the second field represents a step value, indicating that the cron job will run every 2 hours. It matches all values that are divisible evenly by 2 (e.g., 0, 2, 4, 6, etc.). - The third asterisk (\*) represents any day of the month (1-31).
- The fourth asterisk (\*) represents any month (1-12).
- The fifth asterisk (\*) represents any day of the week (0-7).
The `` represents the actual command that will be executed at the 0th minute of every other hour.
Therefore, this cron job will run the specified command once every 2 hours. It will execute at the 0th minute of every other hour throughout the day and month, regardless of the specific date or day of the week.
Please note that the cron job will not run continuously every minute or every hour. Instead, it will run once every 2 hours, precisely at the 0th minute of those hours.
9. Run a job every day (It will run at 00:00):
0 0 * * *Explanation:
The cron job
0 0 * * *is scheduled to run at midnight (00:00) every day.Here's how to interpret the cron expression:
- The
0in the first field represents the specific minute when the cron job will run. In this case, it's set to 0, so the cron job will execute at the start of the hour (00 minutes). - The
0in the second field represents the specific hour when the cron job will run. In this case, it's set to 0, which corresponds to midnight. - The third asterisk (\*) represents any day of the month (1-31).
- The fourth asterisk (\*) represents any month (1-12).
- The fifth asterisk (\*) represents any day of the week (0-7).
- The `` represents the actual command that will be executed at midnight (00:00) every day.
Therefore, this cron job will run the specified command once per day, precisely at midnight. It will execute at 00:00 hours every day, regardless of the specific date or day of the week.
Please note that the cron job will run once per day, specifically at midnight, to perform the task defined by the command.
10. Run a job every day at 3am:
0 3 * * *Explanation:
The cron job
0 3 * * *is scheduled to run at 3:00 AM every day.Here's how to interpret the cron expression:
- The
0in the first field represents the specific minute when the cron job will run. In this case, it's set to 0, so the cron job will execute at the start of the hour (00 minutes). - The
3in the second field represents the specific hour when the cron job will run. In this case, it's set to 3, which corresponds to 3:00 AM. - The third asterisk (\*) represents any day of the month (1-31).
- The fourth asterisk (\*) represents any month (1-12).
- The fifth asterisk (\*) represents any day of the week (0-7).
- The `` represents the actual command that will be executed at 3:00 AM every day.
Therefore, this cron job will run the specified command once per day, specifically at 3:00 AM. It will execute at 3:00 AM every day, regardless of the specific date or day of the week.
11. Run a job every Sunday:
0 0 * * SUNOr,
0 0 * * 0It will run at exactly at 00:00 on Sunday.
The cron job will run once per week, specifically at midnight on Sundays, to perform the task defined by the command.
Explanation:
The cron job
0 0 * * SUNis scheduled to run at midnight (00:00) on Sundays.Here's how to interpret the cron expression:
- The
0in the first field represents the specific minute when the cron job will run. In this case, it's set to 0, so the cron job will execute at the start of the hour (00 minutes). - The
0in the second field represents the specific hour when the cron job will run. In this case, it's set to 0, which corresponds to midnight. - The asterisks (\*) in the third and fourth fields represent any day of the month (1-31) and any month (1-12), respectively.
- The
SUNin the fifth field represents the specific day of the week when the cron job will run. In this case, it's set to SUN, indicating Sundays. - The `` represents the actual command that will be executed at midnight on Sundays.
Therefore, this cron job will run the specified command once per week, specifically at midnight on Sundays. It will execute at 00:00 hours every Sunday, regardless of the specific date or month.
12. Run a job on every day-of-week from Monday through Friday i.e every weekday:
0 0 * * 1-5The job will start at 00:00.
The cron job will run once per day, specifically at midnight, from Monday to Friday, to perform the task defined by the command.
Explanation:
The cron job
0 0 * * 1-5is scheduled to run at midnight (00:00) from Monday to Friday.Here's how to interpret the cron expression:
- The
0in the first field represents the specific minute when the cron job will run. In this case, it's set to 0, so the cron job will execute at the start of the hour (00 minutes). - The
0in the second field represents the specific hour when the cron job will run. In this case, it's set to 0, which corresponds to midnight. - The asterisks (\*) in the third and fourth fields represent any day of the month (1-31) and any month (1-12), respectively.
- The
1-5in the fifth field represents the range of days of the week when the cron job will run. In this case, it's set to 1-5, indicating Monday to Friday. - The `` represents the actual command that will be executed at midnight from Monday to Friday.
Therefore, this cron job will run the specified command once per day, specifically at midnight, from Monday to Friday. It will execute at 00:00 hours on weekdays, regardless of the specific date or month.
13. Run a job every month (i.e at 00:00 on day-of-month 1):
0 0 1 * *The cron job will run once per month, specifically at midnight on the 1st day of the month, to perform the task defined by the command.
Explanation:
The cron job
0 0 1 * *is scheduled to run at midnight (00:00) on the 1st day of every month.Here's how to interpret the cron expression:
- The
0in the first field represents the specific minute when the cron job will run. In this case, it's set to 0, so the cron job will execute at the start of the hour (00 minutes). - The
0in the second field represents the specific hour when the cron job will run. In this case, it's set to 0, which corresponds to midnight. - The
1in the third field represents the specific day of the month when the cron job will run. In this case, it's set to 1, indicating the 1st day of the month. - The asterisks (\*) in the fourth and fifth fields represent any month (1-12) and any day of the week (0-7), respectively.
- The `` represents the actual command that will be executed at midnight on the 1st day of every month.
Therefore, this cron job will run the specified command once per month, specifically at midnight on the 1st day of each month. It will execute at 00:00 hours on the 1st day of the month, regardless of the specific month or day of the week.
14. Run a job at 16:15 on day-of-month 1:
15 16 1 * *The cron job will run once per month, specifically at 4:15 PM (16:15) on the 1st day of the month, to perform the task defined by the command.
Explanation:
The cron job
15 16 1 * *is scheduled to run at 4:15 PM (16:15) on the 1st day of every month.Here's how to interpret the cron expression:
- The
15in the first field represents the specific minute when the cron job will run. In this case, it's set to 15, so the cron job will execute at 15 minutes past the hour. - The
16in the second field represents the specific hour when the cron job will run. In this case, it's set to 16, which corresponds to 4:00 PM. - The
1in the third field represents the specific day of the month when the cron job will run. In this case, it's set to 1, indicating the 1st day of the month. - The asterisks (\*) in the fourth and fifth fields represent any month (1-12) and any day of the week (0-7), respectively.
- The `` represents the actual command that will be executed at 4:15 PM on the 1st day of every month.
Therefore, this cron job will run the specified command once per month, specifically at 4:15 PM on the 1st day of each month. It will execute at 16:15 hours on the 1st day of the month, regardless of the specific month or day of the week.
15. Run a job at every quarter i.e on day-of-month 1 in every 3rd month:
0 0 1 */3 *The cron job will run once every three months, specifically at midnight on the 1st day of the applicable month, to perform the task defined by the command.
Explanation:
The cron job
0 0 1 */3 *is scheduled to run at midnight (00:00) on the 1st day of every third month.Here's how to interpret the cron expression:
- The
0in the first field represents the specific minute when the cron job will run. In this case, it's set to 0, so the cron job will execute at the start of the hour (00 minutes). - The
0in the second field represents the specific hour when the cron job will run. In this case, it's set to 0, which corresponds to midnight. - The
1in the third field represents the specific day of the month when the cron job will run. In this case, it's set to 1, indicating the 1st day of the month. - The
*/3in the fourth field represents a step value, indicating that the cron job will run every 3rd month. It matches all values that are divisible evenly by 3 (e.g., 1, 4, 7, 10). - The asterisks (\*) in the fifth field represent any day of the week (0-7).
- The `` represents the actual command that will be executed at midnight on the 1st day of every third month.
Therefore, this cron job will run the specified command once every three months, specifically at midnight on the 1st day of each applicable month. It will execute at 00:00 hours on the 1st day of every third month, regardless of the specific day of the week.
16. Run a job on a specific month at a specific time:
5 0 * 4 *The job will start at 00:05 in April. The cron job will run once per day, specifically at 12:05 AM, during the month of April, to perform the task defined by the command.
Explanation:
The cron job
5 0 * 4 *is scheduled to run at 12:05 AM (00:05) every day during the month of April.Here's how to interpret the cron expression:
- The
5in the first field represents the specific minute when the cron job will run. In this case, it's set to 5, so the cron job will execute at 5 minutes past the hour. - The
0in the second field represents the specific hour when the cron job will run. In this case, it's set to 0, which corresponds to midnight. - The asterisk (\*) in the third field represents any day of the month (1-31).
- The
4in the fourth field represents the specific month when the cron job will run. In this case, it's set to 4, indicating April. - The asterisk (\*) in the fifth field represents any day of the week (0-7).
- The `` represents the actual command that will be executed at 12:05 AM every day in April.
Therefore, this cron job will run the specified command once per day, specifically at 12:05 AM, during the month of April. It will execute at 00:05 hours on each day of April, regardless of the specific day of the week.
17. Run a job every 6 months:
0 0 1 */6 *This cron job will start at 00:00 on day-of-month 1 in every 6th month. The cron job will run once every six months, specifically at midnight on the 1st day of the applicable month, to perform the task defined by the command.
Explanation:
The cron job
0 0 1 */6 *is scheduled to run at midnight (00:00) on the 1st day of every 6th month.Here's how to interpret the cron expression:
- The
0in the first field represents the specific minute when the cron job will run. In this case, it's set to 0, so the cron job will execute at the start of the hour (00 minutes). - The
0in the second field represents the specific hour when the cron job will run. In this case, it's set to 0, which corresponds to midnight. - The
1in the third field represents the specific day of the month when the cron job will run. In this case, it's set to 1, indicating the 1st day of the month. - The
*/6in the fourth field represents a step value, indicating that the cron job will run every 6th month. It matches all values that are divisible evenly by 6 (e.g., 1, 7, 13). - The asterisks (\*) in the fifth field represent any day of the week (0-7).
- The `` represents the actual command that will be executed at midnight on the 1st day of every 6th month.
Therefore, this cron job will run the specified command once every six months, specifically at midnight on the 1st day of each applicable month. It will execute at 00:00 hours on the 1st day of every 6th month, regardless of the specific day of the week.
18. Run a job on the 1st and 15th of every month:
0 0 1,15 * *This cron job is scheduled to run on the 1st and 15th of every month at midnight (00:00). The cron job will run twice per month, specifically at midnight on the 1st and 15th days, to perform the task defined by the command.
Explanation:
The cron job
0 0 1,15 * *is scheduled to run at midnight (00:00) on the 1st and 15th day of every month.Here's how to interpret the cron expression:
- The
0in the first field represents the specific minute when the cron job will run. In this case, it's set to 0, so the cron job will execute at the start of the hour (00 minutes). - The
0in the second field represents the specific hour when the cron job will run. In this case, it's set to 0, which corresponds to midnight. - The
1,15in the third field represents the specific days of the month when the cron job will run. In this case, it's set to 1 and 15, indicating the 1st and 15th day of the month. - The asterisks (\*) in the fourth and fifth fields represent any month (1-12) and any day of the week (0-7), respectively.
- The `` represents the actual command that will be executed at midnight on the 1st and 15th day of every month.
Therefore, this cron job will run the specified command twice per month, specifically at midnight on the 1st and 15th day of each month. It will execute at 00:00 hours on the 1st and 15th days, regardless of the specific month or day of the week.
19. Run a job every year:
0 0 1 1 *This cron job will start at 00:00 on day-of-month 1 in January. The cron job will run once per year, specifically at midnight on January 1st, to perform the task defined by the command.
Explanation:
The cron job
0 0 1 1 *is scheduled to run at midnight (00:00) on the 1st day of January.Here's how to interpret the cron expression:
- The
0in the first field represents the specific minute when the cron job will run. In this case, it's set to 0, so the cron job will execute at the start of the hour (00 minutes). - The
0in the second field represents the specific hour when the cron job will run. In this case, it's set to 0, which corresponds to midnight. - The
1in the third field represents the specific day of the month when the cron job will run. In this case, it's set to 1, indicating the 1st day of the month. - The
1in the fourth field represents the specific month when the cron job will run. In this case, it's set to 1, indicating January. - The asterisk (\*) in the fifth field represents any day of the week (0-7).
- The `` represents the actual command that will be executed at midnight on the 1st day of January.
Therefore, this cron job will run the specified command once per year, specifically at midnight on the 1st day of January. It will execute at 00:00 hours on January 1st, regardless of the specific day of the week.
Using Cron Job Strings:
We can also use the following strings to define a cron job.
|Cron job strings|Action | |----------------|---------------------| |@reboot |Run once, at startup.| |@yearly |Run once a year. | |@annually |(same as @yearly). | |@monthly |Run once a month. | |@weekly |Run once a week. | |@daily |Run once a day. | |@midnight |(same as @daily). | |@hourly |Run once an hour. |
Supported Cron strings
20. To run a job every time the server is rebooted, add this line in your crontab file.
@rebootExplanation:
The code
@rebootis not a cron job syntax. Instead, it is a special directive that can be used in the cron configuration file.When the
@rebootdirective is used in the cron configuration file, it indicates that the specified `` should be run once when the system reboots or starts up.Here's how it works:
- When the system boots up or restarts, the cron daemon reads the cron configuration file.
- If a cron job has the
@rebootdirective followed by a ``, the specified command is executed at that time. - The command can be any valid command or script that you want to run when the system starts up.
Therefore, using
@rebootin the cron configuration file allows you to schedule a command or script to run automatically once when the system boots up.Please note that the availability and usage of the
@rebootdirective may vary depending on the specific cron implementation and system configuration.21. To remove all cron jobs for the current user:
$ crontab -rThe command
crontab -ris used to remove or delete the current user's crontab (cron table) entries.When you execute
crontab -r, it removes all the scheduled cron jobs associated with your user account. This action is irreversible, and the cron jobs will no longer be executed as per their previously scheduled times.It's important to exercise caution when using this command because it permanently deletes all the cron jobs for your user account, including any recurring tasks or scheduled commands.
Before running
crontab -r, ensure that you have a backup or make sure you no longer need the existing cron jobs. If you accidentally delete your crontab, it may not be recoverable unless you have a backup.To confirm the removal of your crontab, the command usually displays a message such as "crontab: no crontab for ," indicating that the cron table has been successfully removed.
If you wish to edit your crontab in the future, you will need to create new cron entries using
crontab -eor restore from a backup if available.22. For cron job detailed usage, check man pages.
$ man crontabAt this stage, you might have a basic understanding of what is Crontab and how to create, run and manage cron jobs in Linux and Unix-like systems.
Now we will learn about some graphical tools which helps us to make the cron job management a lot easier.
2\. Crontab syntax generators -----------------------------
As you can see, scheduling cron jobs is much easier. Also there are a few web-based crontab syntax generators available to make this job even easier. You don't need to memorize and/or learn crontab syntax.
The following two websites helps you to easily generate a crontab expression based on your inputs. Once you generated the line as per your requirement, just copy/paste it in your crontab file.
2.1. Crontab.guru
Crontab.guru is dedicated website for learning cron jobs examples. Just enter your inputs in the site and it will instantly create a crontab syntax in minutes.
Crontab guru - A quick and simple editor for cron schedule expressions
This site also provides a lot of cron job examples and tips. Do check them and learn how to schedule a cronjob.
2.2. Crontab Generator
This has been pointed out by one of our reader Mr.Horton in the comment section below.
Crontab Generator is yet another website that helps us to quickly and easily generate crontab expressions. A form that has multiple entries is given in this site. The user must choose all required fields in the form.
Finally, hit the "Generate Crontab Line" button at the bottom.
Crontab Generator - Easily generate crontab expressions
In the next screen, the user will see his/her crontab expression. Just copy/paste it to the crontab file. It is that simple.
!Generate crontab entries using Crontab Generator
Generate crontab entries using Crontab Generator
Easy, isn't? Both of these websites will definitely help the newbies who don't have much experience in creating cron jobs.
Remember to review and verify the generated cron syntax from these tools before using it in your cron configuration to ensure it aligns with your requirements and environment.
3\. Crontab graphical front-ends --------------------------------
There are a few Crontab front-end tools available to easily create cron jobs via a graphical interface. No need to edit the Crontab file from command line to add or manage cron jobs! These tools will make cron job management much easier!
3.1. Crontab UI
Crontab UI is a web-based tool to easily and safely manage cron jobs in Linux. You don't need to manually edit the crontab file to create, delete and manage cron jobs. Everything can be done via a web browser with a couple mouse clicks.
Crontab UI allows you to easily create, edit, pause, delete, backup cron jobs and also import, export and deploy jobs on other machines without much hassle.
Have a look at the following link if you're interested to read more about it.
3.2. Zeit
Zeit is a Qt front-end to
crontabandatcommand. Using Zeit, we can add, edit and delete cron jobs via simple graphical interface. For more details, refer the following link:4\. Frequently Asked Questions ------------------------------
Here's an FAQ (Frequently Asked Questions) for Cron jobs.
Q: What is a Cron job?
A: A Cron job is a time-based task scheduler in Linux and Unix-like operating systems. It allows you to schedule and automate the execution of commands or scripts at specified intervals, such as minutes, hours, days, or months.
Q: How do I create a Cron job?
A: To create a Cron job, you can use the
crontabcommand to edit your user-specific cron table. Runcrontab -eto open the table in a text editor and add your desired cron job entry using the specified cron syntax.Q: What is the cron syntax?
A: The cron syntax consists of five fields: minute, hour, day of month, month, and day of week. Each field allows you to specify the desired time or condition for the job to run. For example,
0 12 * * *represents a cron job scheduled to run at 12:00 PM every day.Q: How do I specify multiple values in a field?
A: You can use commas (,) to specify multiple values within a field. For example,
1,15 * * * *means the job will run at the 1st and 15th minute of every hour.Q: Can I use step values in the cron syntax?
A: Yes, you can use step values. For example,
*/15 * * * *means the job will run every 15 minutes. It matches all values divisible evenly by 15.Q: How can I specify the user for a cron job?
A: By default, cron jobs run under the user account that created them. However, you can specify a different user by using
sudo crontab -u username -eto edit the crontab for that particular user.Q: How do I view existing cron jobs?
A: To view the existing cron jobs for your user, run
crontab -l. This command lists the contents of your current crontab.Q: How do I remove a cron job?
A: To remove a cron job, run
crontab -eto edit your crontab and delete the corresponding entry. Alternatively, you can usecrontab -rto remove all cron jobs for your user.Q: Are there any web-based tools available to help generate cron job syntax?
A: Yes, there are web-based crontab syntax generators that can assist you in creating cron job schedules without needing to memorize the syntax. Some notable examples include Crontab.guru and Crontab Generator. These tools allow you to interactively select the desired schedule using user-friendly interfaces and generate the corresponding cron job syntax for you.
These web-based tools can be helpful, especially for those who are new to cron jobs or need a quick way to generate complex schedules. However, it's still important to understand the basics of cron syntax to effectively use and troubleshoot cron jobs in various environments.
Q: Are there any graphical interfaces or front-end tools available for managing cron jobs?
A: Yes, there are Crontab front-end tools that provide graphical interfaces to easily create and manage cron jobs without needing to edit the Crontab file manually from the command line.
Notable examples of such tools include Crontab UI and Zeit. These tools typically offer user-friendly interfaces where you can define cron job schedules, specify the commands or scripts to run, set environment variables, and manage multiple cron jobs in a visual manner.
5\. Conclusion --------------
In this Cron tab tutorial, we discussed what is a cron job, and the basic usage of cron jobs in Linux with example commands.
We also discussed a few web-based crontab syntax generators and crontab graphical front-ends which are used to easily create and manage cron jobs in Linux. Finally, we have listed some most commonly asked questions and answers (FAQ) for Cron Jobs.
Resources:
-
source ***
Frigate NVR with Docker and Home Assistant
!Frigate NVR with Docker and Home Assistant
I have been using Frigate for a while now and recently I moved my whole Frigate setup first from Home Assistant as an add-on to a VirtualBox VM, and finally to a Dell Optiplex Micro running Frigate in a Docker Container. This post and related video are at the request of a number of you who asked to explain how to install Frigate using Docker and then integrating it with Home Assistant.
For those of you unfamiliar with Frigate, it is an "NVR" of sorts. The definition of NVR is loosely applied but is in the official description by the software's author so we'll go with it. It is a complete solution and is designed for Home Assistant. It comes complete with object detection using OpenCV and Tensorflow and can do this real-time with locally based IP cameras from a number of different manufacturers. You can read more about the specifics on their website.
For the sake of this video, I assume that you have a bare metal system running some variant of supported Linux. In addition, you also have Docker Compose installed. When I had this installed on VirtualBox Ubuntu with a Windows 10 host, I was never able to reliably pass my Coral TPU through to Frigate. Having a TPU greatly reduces overhead on the CPU and allows more cameras for the same or fewer compute resources. With that in mind, the Frigate author recommends bare metal Debian-based distributions. My OptiPlex is running Ubuntu 20.04.
Installing this via
docker composeis simple. The hardest part (but not really that hard) is getting the environment set up via a docker-compose.yml file such as the one here.version: "3.9" services: frigate: container_name: frigate privileged: true # this may not be necessary for all setups restart: unless-stopped image: blakeblackshear/frigate:stable shm_size: "64mb" # update for your cameras based on calculation above devices: - /dev/bus/usb:/dev/bus/usb # passes the USB Coral, needs to be modified for other versions - /dev/apex_0:/dev/apex_0 # passes a PCIe Coral, follow driver instructions here https://coral.ai/docs/m2/get-started/#2a-on-linux - /dev/dri/renderD128 # for intel hwaccel, needs to be updated for your hardware volumes: - /etc/localtime:/etc/localtime:ro - /home/mostlychris/frigate/config.yml:/config/config.yml:ro - /home/mostlychris/frigate/storage:/media/frigate - type: tmpfs # Optional: 1GB of memory, reduces SSD/SD Card wear target: /tmp/cache tmpfs: size: 1000000000 ports: - "5000:5000" - "1935:1935" # RTMP feeds environment: FRIGATE_RTSP_PASSWORD: "yourpassword"The important parts are the volumes and ports. You need to make sure that you have mapped the local storage on your device to the location in the frigate docker container. You also need to have config.yml ready to go in the mapped directory of your choice. You can see mine below. It is in the
home/mostlychris/frigate.``` volumes: - /etc/localtime:/etc/localtime:ro - /home/mostlychris/frigate/config.yml:/config/config.yml:ro - /home/mostlychris/frigate/storage:/media/frigate - type: tmpfs # Optional: 1GB of memory, reduces SSD/SD Card wear target: /tmp/cache
```
Additionally, make sure the ports specified are free and not used by another application. The left-hand port is the port on your local machine and the right-hand port is the port inside the docker container. If you need to modify a port because that port is already being, make sure you change the left-hand side.
``` ports: - "5000:5000" - "1935:1935" # RTMP feeds
```
Once you have the docker-compose.yml file set up and you have a valid config.yml for Frigate itself, you can start up the container. Make sure you are in the directory where your docker-compose.yml file and issue the following command (use sudo if you need to).
sudo docker compose upIf all goes well, you'll see log files that show Frigate is up and running.
Sample logfile output
If you are satisfied that it is working correctly, you can ctrl-c out of the running docker container and re-issue the command with a
-dflag which will set the container running in the background.Now that you have that running, you need to integrate into Home Assistant via an integration. Integrations bind external resources or add-ons in to Home Assistant core. For this, go to the Home Assistant intgrations page and add integration.
Add Integration Button on the bottom right of the integrations page
Search for the Frigate integration and select it.
Frigate Integration
You will be presented with a dialog box. An important note here is that you probably won't use the default URL. You will change these to the bare metal device's IP address that you installed Frigate Docker on. In my case, the URL is
http://172.16.1.153:5001. You might notice that I have a different port specified. This is because I already had something else running on 5000 on that box, so I changed the docker-compose.yml file to map 5001 on the hardware to 5000 in the Frigate Docker container.Dialog for integrating Frigate in Home Assistant
If all is successful, you will be presented a dialog showing all the cameras and camera zones you have configured in your Frigate config.yml file.
That about covers the installation of Frigate with Docker and integrating it with Home Assistant. For those asking about the config.yml file I use, I will post it below.
If you want more detail and a walk-through of the whole process, please take a moment to watch my video. Even if you don't need more detail, please watch it anyway 😁. It is super helpful and appreciated because, you know, YouTube algorithms and all. While you're at it, take a moment and do the subscribe thing. That also helps a bunch!
Frigate config.yml file at the time of this posting.
``` ui: use_experimental: true
mqtt: host: 172.16.1.121 port: 1883 topic_prefix: frigate client_id: frigate user: yourmqttuser password: yourmqttpassword stats_interval: 300
record: expire_interval: 10
timestamp_style: position: "tl" format: "%m/%d/%Y %H:%M:%S" color: red: 255 green: 255 blue: 255thickness: 2 effect: shadow
cameras: driveway: ffmpeg: inputs: - path: rtsp://camerauser:[email protected]:554/cam/realmonitor?channel=1&subtype=1 roles: - detect - path: rtsp://camerauser:[email protected]:554/cam/realmonitor?channel=1&subtype=0 roles: - record - rtmp detect: width: 640 height: 480 fps: 5 objects: track: - person - dog - bicycle - cat snapshots: enabled: true timestamp: true bounding_box: true required_zones: - drivewayclose_in - driveway_whole_area - driveway_right_side crop: True height: 500 retain: default: 3 zones: drivewayclose_in: coordinates: 0,480,429,480,443,335,460,173,263,133,88,120,36,212,0,279 objects: - person - dog - cat - bicycle driveway_whole_area: coordinates: 383,52,497,105,569,316,575,480,261,480,0,480,0,225,148,57 objects: - person - cat - dog - bicycle driveway_right_side: coordinates: 424,96,345,438,70,405,307,88 objects: - car motion: mask: - 2,465,328,468,330,432,5,431 - 72,43,154,0,0,0,0,129 record: enabled: True retain: days: 0 events: retain: default: 5 mode: motion required_zones: - drivewayclose_in - driveway_whole_area - driveway_right_side pre_capture: 5 post_capture: 15
front_porch: ffmpeg: inputs: - path: rtsp://camerauser:[email protected]:554/cam/realmonitor?channel=1&subtype=1 roles: - detect - path: rtsp://camerauser:[email protected]:554/cam/realmonitor?channel=1&subtype=0 roles: - record detect: width: 640 height: 480 fps: 5 objects: track: - person - dog - bicycle - cat mask: - 0,480,198,480,200,449,0,451 - 640,0,640,36,640,111,608,135,485,96,504,0 - 439,200,441,324,512,320,532,261,554,188,540,129,451,134 - 370,0,356,100,291,79,292,0 snapshots: enabled: true timestamp: false bounding_box: false crop: True height: 500 required_zones: - front_porch_close_in retain: default: 5 motion: mask: - 0,480,191,480,193,450,0,449 - 459,208,545,202,539,135,481,132 zones: front_porch_close_in: coordinates: 45,480,362,480,640,480,640,213,554,145,524,252,458,259,408,272,348,70,253,64,181,118,67,178 record: enabled: True retain: days: 0 mode: active_objects events: retain: default: 4 mode: active_objects required_zones: - front_porch_close_in pre_capture: 5 post_capture: 15
front_doorbell: ffmpeg: inputs: - path: rtsp://camerauser:[email protected]:554/cam/realmonitor?channel=1&subtype=0 roles: - record - path: rtsp://camerauser:[email protected]:554/cam/realmonitor?channel=1&subtype=1 roles: - detect detect: width: 720 height: 576 fps: 15 objects: track: - person - dog - bicycle - cat snapshots: enabled: true timestamp: false bounding_box: false crop: True height: 500 retain: default: 5 motion: mask: - 720,0,720,28,430,22,428,0 record: enabled: True retain: days: 0 mode: active_objects events: retain: default: 4 mode: active_objects pre_capture: 10 post_capture: 15
back_porch: ffmpeg: inputs: - path: rtsp://camerauser:[email protected]:554/Streaming/Channels/102 roles: - detect - path: rtsp://camerauser:[email protected]:554/Streaming/Channels/101 roles: - record detect: width: 640 height: 480 fps: 6 objects: track: - person - dog - cat - bird - mouse filters: cat: min_score: 0.3 threshold: 0.5 dog: min_score: 0.3 threshold: 0.5 mask: - 23,480,333,480,333,442,26,440 - 640,95,640,0,464,0 - 258,211,323,246,357,142,274,140 - 383,342,457,365,477,261,401,232 - 425,131,553,227,640,251,640,213,607,176,460,88 snapshots: enabled: true timestamp: false bounding_box: true retain: default: 3 motion: mask: - 337,480,341,437,0,433,0,480,40,480
zones: deck_area: coordinates: 0,284,0,457,207,480,474,480,640,480,540,406,392,259,253,106,166,31,108,49,0,72 record: enabled: True retain: days: 0 events: retain: default: 4 mode: motion pre_capture: 5 post_capture: 15
deck: ffmpeg: inputs: - path: rtsp://camerauser:[email protected]:554/Streaming/Channels/102 roles: - detect - path: rtsp://camerauser:[email protected]:554/Streaming/Channels/101 roles: - record detect: width: 640 height: 480 fps: 6 objects: track: - person - dog - cat - bird - mouse filters: cat: min_score: 0.3 threshold: 0.5 dog: min_score: 0.3 threshold: 0.5 person: mask: - 79,385,107,480,287,480,259,313,107,268 - 294,82,396,93,411,57,295,44 snapshots: enabled: true timestamp: false bounding_box: true retain: default: 4 motion: mask: - 374,480,640,480,640,442,372,442 record: enabled: True retain: days: 0 events: retain: default: 4 mode: motion pre_capture: 5 post_capture: 15
garage: ffmpeg: inputs: - path: rtsp://camerauser:[email protected]:554/cam/realmonitor?channel=1&subtype=1 roles: - detect - path: rtsp://camerauser:[email protected]:554/cam/realmonitor?channel=1&subtype=0 roles: - record detect: width: 640 height: 480 fps: 5 objects: track: - person - dog - cat snapshots: enabled: true timestamp: false bounding_box: true retain: default: 3 record: enabled: True retain: days: 0 events: retain: default: 4 mode: active_objects pre_capture: 5 post_capture: 15 motion: mask: - 352,93,477,95,554,99,640,94,640,0,343,0 - 457,480,640,480,640,445,453,444
Reolink
reolink_portable: ffmpeg: inputs: - path: rtsp://camerauser:[email protected]:554/h264Preview_01_main roles: - record - path: rtsp://camerauser:[email protected]:554/h264Preview_01_sub roles: - detect detect: width: 640 height: 360 fps: 7 objects: track: - person - dog - bicycle - cat snapshots: enabled: true timestamp: true bounding_box: true retain: default: 5 record: enabled: true retain_days: 0 events: retain: default: 5 motion: mask: - 640,360,640,330,411,325,415,360 - 640,33,640,0,0,0,0,34 - 640,109,640,170,576,121,589,78
detectors:
cpu1:
type: cpu
num_threads: 3
coral: type: edgetpu device: usb
rtmp: enabled: false
birdseye: enabled: True width: 1280 height: 720 quality: 1 mode: objects live: height: 640 quality: 1
-
How to install SAMBA on Ubuntu 22.04 LTS Jammy Linux
linuxconfig.org How to Install Samba in Ubuntu {+Configuring and Connecting}Samba is a free tool for file-sharing between Linux and other OSs. Read this guide and learn how to install and configure Samba in Ubuntu.

How to configure Samba Server share on Ubuntu 22.04 Jammy Jellyfish Linux - Linux Tutorials - Learn Linux Configuration
File servers often need to accommodate a variety of different client systems. Running Samba on Ubuntu 22.04 Jammy Jellyfish allows Windows systems to connect and access files, as well as other Linux systems and MacOS. An alternative solution would be to run an FTP/SFTP server on Ubuntu 22.04, which can also support the connections from many systems.
The objective of this tutorial is to configure a basic Samba server on Ubuntu 22.04 Jammy Jellyfish to share user home directories as well as provide read-write anonymous access to selected directory.
There are myriads of possible other Samba configurations, however the aim of this guide is to get you started with some basics which can be later expanded to implement more features to suit your needs. You will also learn how to access the Ubuntu 22.04 Samba server from a Windows system.
In this tutorial you will learn:
- How to install Samba server
- How to configure basic Samba share
- How to share user home directories and public anonymous directory
- How to mount Samba share on MS Windows 10
!How to configure Samba Server share on Ubuntu 22.04 Jammy Jellyfish Linux
How to configure Samba Server share on Ubuntu 22.04 Jammy Jellyfish Linux
Software Requirements and Linux Command Line Conventions
- Category: System
- Requirements, Conventions or Software Version Used: Ubuntu 22.04 Jammy Jellyfish
- Category: Software
- Requirements, Conventions or Software Version Used: Samba
- Category: Other
- Requirements, Conventions or Software Version Used: Privileged access to your Linux system as root or via the sudo command.
- Category: Conventions
- Requirements, Conventions or Software Version Used: # – requires given linux commands to be executed with root privileges either directly as a root user or by use of sudo command$ – requires given linux commands to be executed as a regular non-privileged user
How to configure Samba Server share on Ubuntu 22.04 step by step instructions -----------------------------------------------------------------------------
- Let’s begin by installation of the Samba server. This is a rather trivial task. First, open a command line terminal and install the
taskselcommand if it is not available yet on your Ubuntu 22.04 system. Once ready, usetaskselto install the Samba server.
``` $ sudo apt update $ sudo apt install tasksel $ sudo tasksel install samba-server
```
- We will be starting with a fresh clean configuration file, while we also keep the default config file as a backup for reference purposes. Execute the following Linux commands to make a copy of the existing configuration file and create a new
/etc/samba/smb.confconfiguration file:
``` $ sudo cp /etc/samba/smb.conf /etc/samba/smb.conf_backup $ sudo bash -c 'grep -v -E "#|;" /etc/samba/smb.conf_backup | grep . > /etc/samba/smb.conf'
```
- Samba has its own user management system. However, any user existing on the samba user list must also exist within the
/etc/passwdfile. If your system user does not exist yet, hence cannot be located within/etc/passwdfile, first create a new user using theuseraddcommand before creating any new Samba user. Once your new system user eg.linuxconfigexits, use thesmbpasswdcommand to create a new Samba user:
``` $ sudo smbpasswd -a linuxconfig New SMB password: Retype new SMB password: Added user linuxconfig.
```
- Next step is to add the home directory share. Use your favourite text editor, ex. atom, sublime, to edit our new
/etc/samba/smb.confAamba configuration file and add the following lines to the end of the file:
``` [homes] comment = Home Directories browseable = yes read only = no create mask = 0700 directory mask = 0700 valid users = %S
```
- Optionally, add a new publicly available read-write Samba share accessible by anonymous/guest users. First, create a directory you wish to share and change its access permission:
``` $ sudo mkdir /var/samba $ sudo chmod 777 /var/samba/
```
- Once ready, once again open the
/etc/samba/smb.confsamba configuration file and add the following lines to the end of the file:
``` [public] comment = public anonymous access path = /var/samba/ browsable =yes create mask = 0660 directory mask = 0771 writable = yes guest ok = yes
```
- Check your current configuration. Your
/etc/samba/smb.confsamba configuration file should at this stage look similar to the one below:
``` [global] workgroup = WORKGROUP server string = %h server (Samba, Ubuntu) log file = /var/log/samba/log.%m max log size = 1000 logging = file panic action = /usr/share/samba/panic-action %d server role = standalone server obey pam restrictions = yes unix password sync = yes passwd program = /usr/bin/passwd %u passwd chat = Enter\snew\s\spassword:* %n\n Retype\snew\s\spassword:* %n\n password\supdated\ssuccessfully . pam password change = yes map to guest = bad user usershare allow guests = yes [printers] comment = All Printers browseable = no path = /var/spool/samba printable = yes guest ok = no read only = yes create mask = 0700 [print$] comment = Printer Drivers path = /var/lib/samba/printers browseable = yes read only = yes guest ok = no [homes] comment = Home Directories browseable = yes read only = no create mask = 0700 directory mask = 0700 valid users = %S [public] comment = public anonymous access path = /var/samba/ browsable =yes create mask = 0660 directory mask = 0771 writable = yes guest ok = yes
```
- Our basic Samba server configuration is done. Remember to always restart your samba server, after any change has been done to
/etc/samba/smb.confconfiguration file:
``` $ sudo systemctl restart smbd
```
- (optional) Let’s create some test files. Once we successfully mount our Samba shares, the below files should be available to our disposal:
``` $ touch /var/samba/public-share $ touch /home/linuxconfig/home-share
```
Access Ubuntu 22.04 Samba share from MS Windows -----------------------------------------------
-
At this stage we are ready to turn our attention to MS Windows. Mounting network drive directories might be slightly different for each MS Windows version. This guide uses MS Windows 10 in a role of a Samba client. To start, open up your
Windows Explorerthen right click onNetworkand click onMap network drive...tab.!Map network drive option on MS Windows
Map network drive option on MS Windows
-
Next, select the drive letter and type Samba share location which is your Samba server IP address or hostname followed by the name of the user’s home directory. Make sure you tick
Connect using different credentialsif your username and password is different from Samba one created with thesmbpasswdcommand on Ubuntu 22.04.[!Select network folder configuration options and click Next](https://linuxconfig.org/wp-content/uploads/2022/03/02-how-to-configure-samba-server-share-on-ubuntu-22-04-jammy-jellyfish-linux.png)
Select network folder configuration options and click Next
-
Enter Samba user’s password as created earlier on Ubuntu 22.04.
Enter Samba password
-
-
Browse user’s home directory. You should be able to see the previously created test file. As well as you should be able to create new directories and files.
!The home directory is browsable, with read and write permissions
The home directory is browsable, with read and write permissions
-
Repeat the mounting steps also for the publicly anonymous samba directory share.
!Mount the public Samba directory to a different drive letter in Windows
Mount the public Samba directory to a different drive letter in Windows
-
Confirm that you can access the Public samba share directory.
!Connected to the public Samba share and the test file is viewable
Connected to the public Samba share and the test file is viewable
All done. Now feel free to add more features to your Samba share server configuration.
Closing Thoughts ----------------
In this tutorial, we learned how to install Samba on Ubuntu 22.04 Jammy Jellyfish Linux. We also saw how to create a Samba share, a Samba user, and configure read and write access. Then, we went over the steps to connect to our Samba server from a client machine running MS Windows. Using this guide should allow you to create a file server that can host connections from various operating systems.
```
-
How to Partition and Format Disk Drives on Linux
www.cherryservers.com How to Partition and Format Disk Drives on Linux - Cherry ServersThis article will walk you through how you can partition and format disks to complete common Linux administration tasks.

How to Partition and Format Disk Drives on Linux - Cherry Servers
Formatting and partitioning disks is a key aspect of Linux administration. You can use formatting and partitioning to address use cases like prepping storage media for use, addressing space issues with existing disks, or wiping a filesystem.
This article will walk you through how you can partition and format disks to complete common Linux administration tasks.
What is disk formatting in Linux? ---------------------------------
Disk formatting is the process that prepares a storage partition for use. Formatting deletes the existing data on the partition and sets up a filesystem.
Some of the most popular filesystems for Linux include:
- Ext4 - Ext4 is a common default filesystem on many modern Linux distributions. It supports file sizes up to 16TB and volumes up to 1EB. It is not supported on Windows by default.
- NTFS - NTFS is a popular filesystem developed by Microsoft. It supports 8PB max volume and file sizes. The Linux kernel added full support for NTFS in version 5.15.
- FAT32 - Is an older filesystem, but you may still see it used in the wild. It supports a 4GB max file size and a 2TB max volume size. Many \*nix and Windows operating systems support FAT32.
What is partitioning in Linux? ------------------------------
Partitioning is the process of creating logical boundaries on a storage device. Common examples of storage devices include hard disk drives (HDDs), solid-state drives (SSDs), USB flash drives, and SD cards. Creating a partition on a drive logically separates it from other partitions. This logical separation can be useful for a variety of scenarios, including limiting the growth of a filesystem and installing multiple operating systems on a single drive.
How to Partition and Format Disk Drives on Linux ------------------------------------------------
Now let's dive into partitioning and formatting disks on a Linux system.
Prerequisites
Before we begin, you'll need:
- Access to the terminal of a Linux system. We'll use Ubuntu 22.04 LTS.
- sudo/root privileges
- An available disk you want to format and partition. We are going to use a server with custom partitioning layout from Cherry Servers.
- Backups of any data you don't want to lose (optional)
How to view disks in Linux
To view available disks in Linux, run this command:
``` fdisk -l | grep "Disk /"
```
Output should look similar to:
The
fsdiskoutput above included loop devices which are logical pseudo-devices, but not real disks. If you need a more refined view of your disks, use thelsblk -I 8 -dcommand. "-I 8" specifies a the kernel device number for block devices and the -d excludes partitions.The output should look similar to:
If you need more information to properly identify your drives, use
lshw -class disk. The output will include additional identifying information such as the product, size, vendor, bus, and logical name (the device’s path), similar to this:!list more information about disk devices
How to view existing partitions in Linux
Before you create a new partition, you may want to view your existing partitions. To view existing partitions in Linux, use the
lsblkcommand. The output should look similar to:!list existing disk partitions
Partitions have a
TYPEofpartand are nested under their disks in the output likesda1in our example.If you want to see information like file system types, disk labels and UUIDs, use the command
lsblk -f. The output should look similar to:!list full information about existing disk partitions
How to Partition a Disk in Linux
There are several ways to partition disks in Linux, including
partedandgparted, but we'll focus on the popularfdiskutility here. For our case, we'll assume our disk is mounted on/dev/sda. We will create a primary partition and use the default partition number, first sector, and last sector thatfdiskselects. You can modify these options based on your requirements.Note: If you're partitioning a disk that is currently mounted, first unmount it with the command \`umount </path/to/disk>.
To begin, we'll open our drive in
fdiskwith this command:``` fdisk /dev/sda
```
That will launch the interactive
fdiskutility and you should see output similar to:At the
Command (m for help):prompt, typento create a new partition. The output should look similar to:It shows that the disk that is mounted on /dev/sda directory has one primary partition that is formatted and being used at the moment.
We'll press enter to select the default and create a new primary partition. Then, we'll be prompted to give a partition number.
We'll use the default of
2and then get prompted for a sector number.We'll press enter to accept the default first sector, and then get prompted for a last sector.
Again, we'll press enter to accept the default and
fdiskwill create the partition. Note that if we wanted to create a smaller partition, we could use a smaller gap between our first and last block. This would enable us to create multiple partitions on the drive.The full output looks like this:
You may enter
pto see a partition table and make sure your changes are correct:As you can see, we now have two partitions on the
/dev/sdadisk. At theCommand (m for help):prompt, input awto write the changes to the Linux system. The output should look similar to:fdiskwill then exit and you'll be back at Linux shell. We can see our newly created partitionsdaby running the commandlsblk /dev/sda. The output should look similar to:How to format a disk in Linux
Now that our disk is fully partitioned, we can format the newly created
sda2partition. The general syntax for formatting a disk partition in Linux is:``` mkfs.<filesystem> </path/to/disk/partition>
```
For example, to format our newly created
/dev/sda2partition, we can use this command:``` mkfs.ext4 /dev/sda2
```
The output should look similar to:
!format new partition to ext4 file system
To use an NTFS filesystem instead, the command is:
``` mkfs.ntfs /dev/sda2
```
To use a FAT32 filesystem instead, the command is:
``` mkfs.fat -F 32 /dev/sda2
```
The
-Fparameter specifies theFAT-TYPE, which determines if the file allocation tables are 12, 16, or 32-bit.How to mount a disk in Linux
Once a disk is partitioned and formatted, we can mount the filesystem in Linux.
First, if your mount point doesn't already exist, created it with the
mkdircommand. The general command syntax is:``` mkdir </path/for/your/mount/point>
```
For example, to make our mount point
/var/cherry, use this command:``` mkdir /var/cherry
```
Next, we mount our partition using the
mountcommand. The general command structure to mount a disk partition in Linux is:``` mount -t <filesystem_type> -o <options> </path/to/disk/partition> </path/for/your/mount/point>
```
Note: If you omit the
-toption, themountcommand will default toautoand attempt to guess the correct filesystem type.For example, to mount our
/dev/sda2(which has an Ext4 filesystem) to/var/cherryin read/write mode, we can use this command"``` mount -t ext4 -o rw /dev/sda2 /var/cherry
```
If there are no errors, the command will not return any output.
You can confirm your partitions mount point is correct with the
lsblk /dev/sdacommand. The output should include a new mountpoint/var/cherryfor your newly formatted/dev/sda2device:Finally, to ensure the disk automatically mounts when your Linux system boots, you need to add it to
/etc/fstab.⚠️ Warning: Be careful! Errors in
/etc/fstabcan cause your system not to boot!The general format for an
/etc/fstabpartition entry is``` </path/to/disk/partition> </path/for/your/mount/point> <filesystem_type> <options_from_mount> <dump> <pass_number>
```
Paraphrasing Ubuntu's Fstab File Configuration,
<dump>enables or disables backups using the command dump. It can be set to 1 (enabled) or 0 (disabled) and is generally disabled.<pass_number>determines the orderfsckchecks the partition for errors when the system boots. Generally, a system's root device is 1 and other partitions are 2. 0 disables thefsckcheck on boot.To edit
/etc/fstab, open it in a text editor likenanoorvimand make the changes. For our/dev/sda2partition mounted at/var/cherry, we'll use this configuration:``` /dev/sda2 /var/cherry ext4 rw 0 0
```
Save the changes and close your text editor when you're done.
Conclusion ----------
That's it! Now you know the basics of how to partition and format disks on Linux. For a deeper dive on the topic of partitioning, formatting, and mounting drives, we recommend reading the man pages for the specific tools we used here like the
mkfs.<type>utilities (e.g. mkfs.ext4), fdisk, mount, and fstab. -
CIDR to IPv4 Conversion
www.ipaddressguide.com CIDR to IPv4 Address Range Utility Tool | IPAddressGuideFree IP address tool to translate IPv4 address range into CIDR (Classless Inter-Domain Routing) format and vice-versa.

CIDR to IPv4 Address Range Utility Tool | IPAddressGuide
CIDR is the short for Classless Inter-Domain Routing, an IP addressing scheme that replaces the older system based on classes A, B, and C. A single IP address can be used to designate many unique IP addresses with CIDR. A CIDR IP address looks like a normal IP address except that it ends with a slash followed by a number, called the IP network prefix. CIDR addresses reduce the size of routing tables and make more IP addresses available within organizations. Please try out our CIDR calculator below.
Add CIDR Widget To Your Website
You can easily add the CIDR widget on your website by copying the following HTML code and place it on your web page
<div style="text-align:center"> <form action="https://www.ipaddressguide.com/cidr" method="post"> <p style="background:#fff;border:1px solid #99A8AE;width:180px;padding:5px 5px 5px 5px;font-size:11px;font-family:'Trebuchet MS',Arial,Sans-serif;"> <a href="https://www.ipaddressguide.com" target="_blank"><img src="https://www.ipaddressguide.com/images/ipaddressguide.png" alt="CIDR to IPv4 Address Range Utility Tool | IPAddressGuide" border="0" width="120" height="12" /></a><br /> <b>CIDR to IPv4 Conversion</b><br /><br /> <label>CIDR</label><br /> <input type="text" name="cidr" value="" style="border:solid 1px #C0C0C0;font-size:9px;width:110px;" /><br /> <input type="submit" value="Calculate" style="width:100px;font-size:10px;margin-top:3px;padding:2px 3px;color:#FFF;background:#8EB50C;border-width:1px;border-style:solid;"> </p> </form> </div>Related Articles
What is CIDR
This guide explains about what is CIDR and its benefits.
Convert IP2Location CSV data into IP ranges or CIDR
The article discusses about how to convert IP2Location CSV data into IP ranges or CIDR.
Converting IP address ranges into CIDR format
The article demonstrates how to convert IP addresses ranges into CIDR format.
Converting IP2Proxy data from IP number ranges to CIDR
This guide demonstrates how to convert the IP2Proxy data from IP number ranges to CIDR.
-
Synchronizing folders with rsync
Synchronizing folders with rsync
In this post I cover the basics of
rsync, in preparation for a subsequent post that will cover backups and it's use in conjunction with cronjobs to automatize the backup process. From the copying and synchronization of local files and folders, to it's use for transfer information among computers. Its use as a daemon when SSH is unavailable was moved to it's own section.Topics The basics of rsync Copying local files and folders Dealing with whitespace and rare characters Update the contents of a folder Synchronizing two folders with rsync Compressing the files while transferring them Transferring files between two remote systems Excluding files and directories Running rsync as a daemon (moved to it's own section) Some additional rsync parameters Footnotes
The basics of rsync
rsyncis a very versatile copying and backup tool that is included by default in almost every Linux distribution. It can be used as an advanced copying tool, allowing us to copy files both locally and remotely. It can also be used as a backup tool. It supports the creation of incremental backups.rsynccounts with a famous delta-transfer algorithm that allows us to transfer new files as well as recent changes to existent files, while ignoring unchanged files. Additionally to this, the behavior ofrsynccan be throughly customized, helping us to automatize backups, it can also be run as a daemon to turn the computer into a host and allowrsyncclients connect to it.Besides the copying of local files and folders,
rsyncallow us to copy over SSH (Secure Shell), RSH (Remote Shell) and it can be run as a daemon in a computer and allow other computers to connect to it, whenrsyncis run as a daemon it listens to the port TCP 873.When we use
rsyncas a daemon or when we use RSH, the data that is send between computers travels unencrypted, so, if you are transferring files between two computers in the same local network, this is useful, but this shouldn't be used to transfer files over insecure networks, such as the Internet. For this purpose SSH is the way to go.This is the main reason why I favor the use of SSH for my transfers, besides, since SSH is secure, many servers have the SSH daemon available. But the use of
rsyncas a daemon for transfers over fast connections, as is usually the case in a local network, is useful. I don't have the RSH daemon running in my computers so you may find me a bit biased about SSH in the examples. The examples covering the transfer of files between two computers use SSH as the medium of transport, but in a separate post I cover the use of rsync as a daemon.Copying local files and folders
To copy the contents of one local folder into another, replacing the files in the destination folder, we use:
rsync -rtv source_folder/ destination_folder/In the source\_folder notice that I added a slash at the end, doing this prevents a new folder from being created, if we don't add the slash, a new folder named as the source folder will be created in the destination folder. So, if you want to copy the contents of a folder called Pictures into an existent folder which is also called Pictures but in a different location, you need to add the trailing slash, otherwise, a folder called Pictures is created inside the Pictures folder that we specify as destination.
rsync -rtv source/ destination/!A graphical representation of the results of rsync with a trailing slash in the source folder.rsync -rtv source destination/!A graphical representation of the results of rsync without a trailing slash in the source folder.The parameter
-rmeans recursive, this is, it will copy the contents of the source folder, as well as the contents of every folder inside it.The parameter
-tmakes rsync preserve the modification times of the files that it copies from the source folder.The parameter
-vmeans verbose, this parameter will print information about the execution of the command, such as the files that are successfully transferred, so we can use this as a way to keep track of the progress of rsync.This are the parameters that I frequently use, as I am usually backing up personal files and this doesn't contain things such as symlinks, but another very useful parameter to use rsync with is the parameter -a.
rsync -av source/ destination/The parameter
-aalso makes the copy recursive and preserve the modification times, but additionally it copies the symlinks that it encounters as symlinks, preserve the permissions, preserve the owner and group information, and preserve device and special files. This is useful if you are copying the entire home folder of a user, or if you are copying system folders somewhere else.Dealing with whitespace and rare characters
We can escape spaces and rare characters just as in bash, by the use of \\ before any whitespace and rare character. Additionally, we can use single quotes to enclose the string:
rsync -rtv so\{ur\ ce/ dest\ ina\{tion/ rsync -rtv 'so{ur ce/' 'dest ina{tion/'Update the contents of a folder
In order to save bandwidth and time, we can avoid copying the files that we already have in the destination folder that have not been modified in the source folder. To do this, we can add the parameter
-utorsync, this will synchronize the destination folder with the source folder, this is where the delta-transfer algorithm enters. To synchronize two folders like this we use:rsync -rtvu source_folder/ destination_folder/By default,
rsyncwill take into consideration the date of modification of the file and the size of the file to decide whether the file or part of it needs to be transferred or if the file can be left alone, but we can instead use a hash to decide whether the file is different or not. To do this we need to use the-cparameter, which will perform a checksum in the files to be transferred. This will skip any file where the checksum coincides.rsync -rtvuc source_folder/ destination_folder/Synchronizing two folders with rsync
To keep two folders in synchrony, not only do we need to add the new files in the source folder to the destination folder, as in the past topics, we also need to remove the files that are deleted in the source folder from the destination folder.
rsyncallow us to do this with the parameter--delete, this used in conjunction with the previously explained parameter-uthat updates modified files allow us to keep two directories in synchrony while saving bandwidth.rsync -rtvu --delete source_folder/ destination_folder/The deletion process can take place in different moments of the transfer by adding some additional parameters:
- rsync can look for missing files and delete them before it does the transfer process, this is the default behavior and can be set with
--delete-before - rsync can look for missing files after the transfer is completed, with the parameter
--delete-after - rsync can delete the files done during the transfer, when a file is found to be missing, it is deleted at that moment, we enable this behavior with
--delete-during - rsync can do the transfer and find the missing files during this process, but instead of delete the files during this process, waits until it is finished and delete the files it found afterwards, this can be accomplished with
--delete-delay
e.g.:
rsync -rtvu --delete-delay source_folder/ destination_folder/Compressing the files while transferring them
To save some bandwidth, and usually it can save some time as well, we can compress the information being transfer, to accomplish this we need to add the parameter
-zto rsync.rsync -rtvz source_folder/ destination_folder/Note, however, that if we are transferring a large number of small files over a fast connection, rsync may be slower with the parameter -z than without it, as it will take longer to compress every file before transfer it than just transferring over the files. Use this parameter if you have a a connection with limited speed between two computers, or if you need to save bandwidth.
Transferring files between two remote systems
rsynccan copy files and synchronize a local folder with a remote folder in a system running the SSH daemon, the RSH daemon, or the rsync daemon. The examples here use SSH for the file transfers, but the same principles apply if you want to do this withrsyncas a daemon in the host computer, read Running rsync as a daemon when ssh is not available further below for more information about this.To transfer files between the local computer and a remote computer, we need to specify the address of the remote system, it may be a domain name, an IP address, or a the name of a server that we have already saved in our SSH config file (information about how to do this can be found in Defining SSH servers), followed by a colon, and the folder we want to use for the transfer. Note that rsync can not transfer files between two remote systems, only a local folder or a remote folder can be used in conjunction with a local folder. To do this we use:
Local folder to remote folder, using a domain, an IP address and a server defined in the SSH configuration file:
rsync -rtvz source_folder/ user@domain:/path/to/destination_folder/ rsync -rtvz source_folder/ [email protected]:/path/to/destination_folder/ rsync -rtvz source_folder/ server_name:/path/to/destination_folder/Remote folder to local folder, using a domain, an IP address and a server defined in the SSH configuration file:
rsync -rtvz user@domain:/path/to/source_folder/ destination_folder/ rsync -rtvz [email protected]:/path/to/source_folder/ destination_folder/ rsync -rtvz server_name:/path/to/source_folder/ destination_folder/Excluding files and directories
There are many cases in which we need to exclude certain files and directories from rsync, a common case is when we synchronize a local project with a remote repository or even with the live site, in this case we may want to exclude some development directories and some hidden files from being transfered over to the live site. Excluding files can be done with
--excludefollowed by the directory or the file that we want to exclude. The source folder or the destination folder can be a local folder or a remote folder as explained in the previous section.rsync -rtv --exclude 'directory' source_folder/ destination_folder/ rsync -rtv --exclude 'file.txt' source_folder/ destination_folder/ rsync -rtv --exclude 'path/to/directory' source_folder/ destination_folder/ rsync -rtv --exclude 'path/to/file.txt' source_folder/ destination_folder/The paths are relative to the folder from which we are calling rsync unless it starts with a slash, in which case the path would be absolute.
Another way to do this is to create a file with the list of both files and directories to exclude from rsync, as well as patterns (all files that would match the pattern would be excluded, \*.txt would exclude any file with that extension), one per line, and call this file with
--exclude-fromfollowed by the file that we want to use for the exclusion of files. First, we create and edit this file in our favorite text editor, in this example I use gedit, but you may use kate, Vim, nano, or any other text editor:touch excluded.txt gedit excluded.txtIn this file we can add the following:
directory relative/path/to/directory file.txt relative/path/to/file.txt /home/juan/directory /home/juan/file.txt *.swpAnd then we call rsync:
rsync -rvz --exclude-from 'excluded.txt' source_folder/ destination_folder/In addition to delete files that have been removed from the source folder, as explained in Synchronizing two folders with rsync,
rsynccan delete files that are excluded from the transfer, we do this with the parameter--delete-excluded, e.g.:rsync -rtv --exclude-from 'excluded.txt' --delete-excluded source/ destination/This command would make
rsyncrecursive, preserve the modification times from the source folder, increase verbosity, exclude all the files that match the patterns in the fileexcluded.txt, and delete all of this files that match the patternif they exist in the destination folder.Running rsync as a daemon when ssh is not available
This was moved to it's own section, Running rsync as a daemon.
Some additional rsync parameters
-tPreserves the modification times of the files that are being transferred.-qSuppress any non-error message, this is the contrary to -v which increases the verbosity.-dTransfer a directory without recursing, this is, only the files that are in the folder are transferred.-lCopy the symlinks as symlinks.-LCopy the file that a symlink is pointing to whenever it finds a symlink.-WCopy whole files. When we are using the delta-transfer algorithm we only copy the part of the archive that was updated, sometimes this is not desired.--progressShows the progress of the files that are being transferred.-hShows the information that rsync provides us in a human readable format, the amounts are given in K's, M's, G's and so on.Footnotes
The amount of options that
rsyncprovide us is immense, we can define exactly which files we want to transfer, what specific files we want to compress, what files we want to delete in the destination folder if this files exists, and we can deal with system files as well, for more information we can useman rsyncandman rsyncd.confI leave the information concerning backups out of this post, as this will be covered, together with the automation of the backups, in an incoming post.
It is possible to run rsync on Windows with the use of cygwin, however I don't have a Windows box available at the moment (nor do I plan to aquire one in the foreseeable future), so even thought I have done it I can't post about this. If you run
rsyncas a service in Windows tho, you need to add the line "strict mode = false" inrsyncd.confunder the modules area, this will preventrsyncfrom checking the permissions in the secrets file and thus failing because they are not properly set (as they don't work the same as in Linux).This post may be updated if there is something to correct or to add a little more information if I see it necessary.
- rsync can look for missing files and delete them before it does the transfer process, this is the default behavior and can be set with
-
How To: Linux Show List Of Network Cards
source ***
How To: Linux Show List Of Network Cards
How do I display a list of all network cards under Linux operating systems?
You can use any one of the following command to list network cards installed under Linux operating systems. Please note that the ifconfig and ip commands will also display interfaces information about vpn, loopback, and other configured interfaces.
- lspci command : List all PCI devices.
- lshw command : Linux identify Ethernet interfaces and NIC hardware.
- dmidecode command : List all hardware data from BIOS.
- ifconfig command : Outdated network config utility.
- ip command : Recommended new network config utility.
- hwinfo command : Probe Linux for network cards.
- ethtool command : See NIC/card driver and settings on Linux.
We use standard terms, such as the network interface controller (NIC). Also known as a network interface card, network adapter, LAN adapter or physical network interface, and so on. Let us see some useful examples for displaying out NIC info on Linux machine.
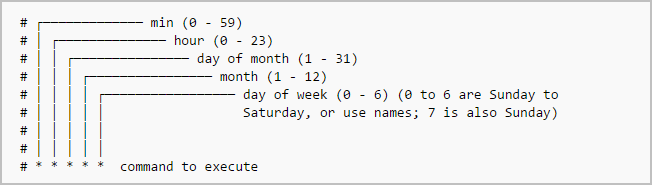
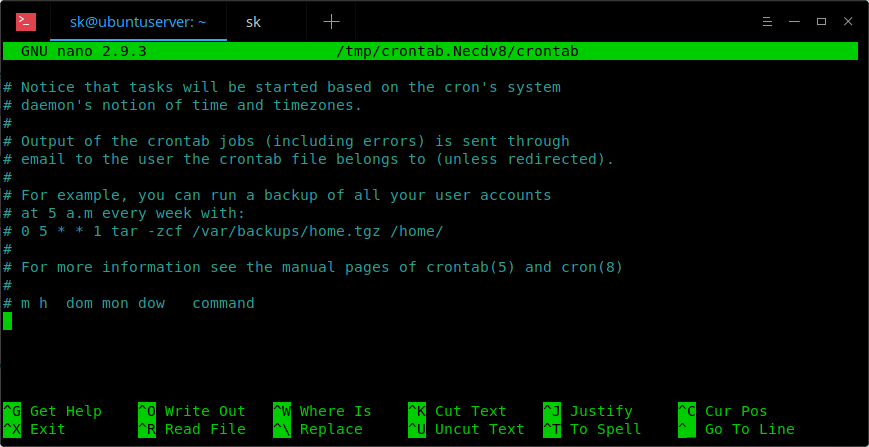
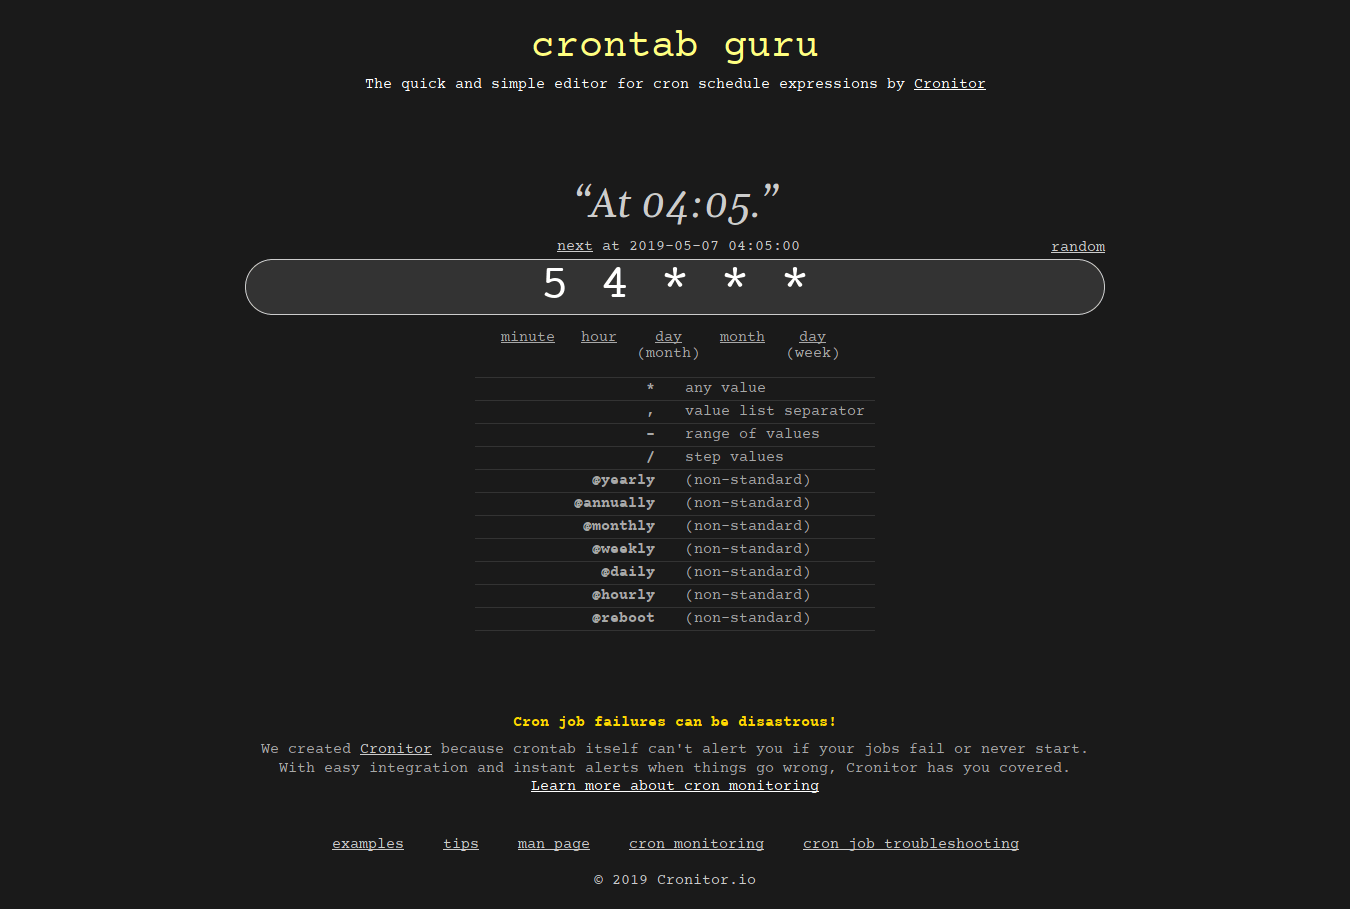
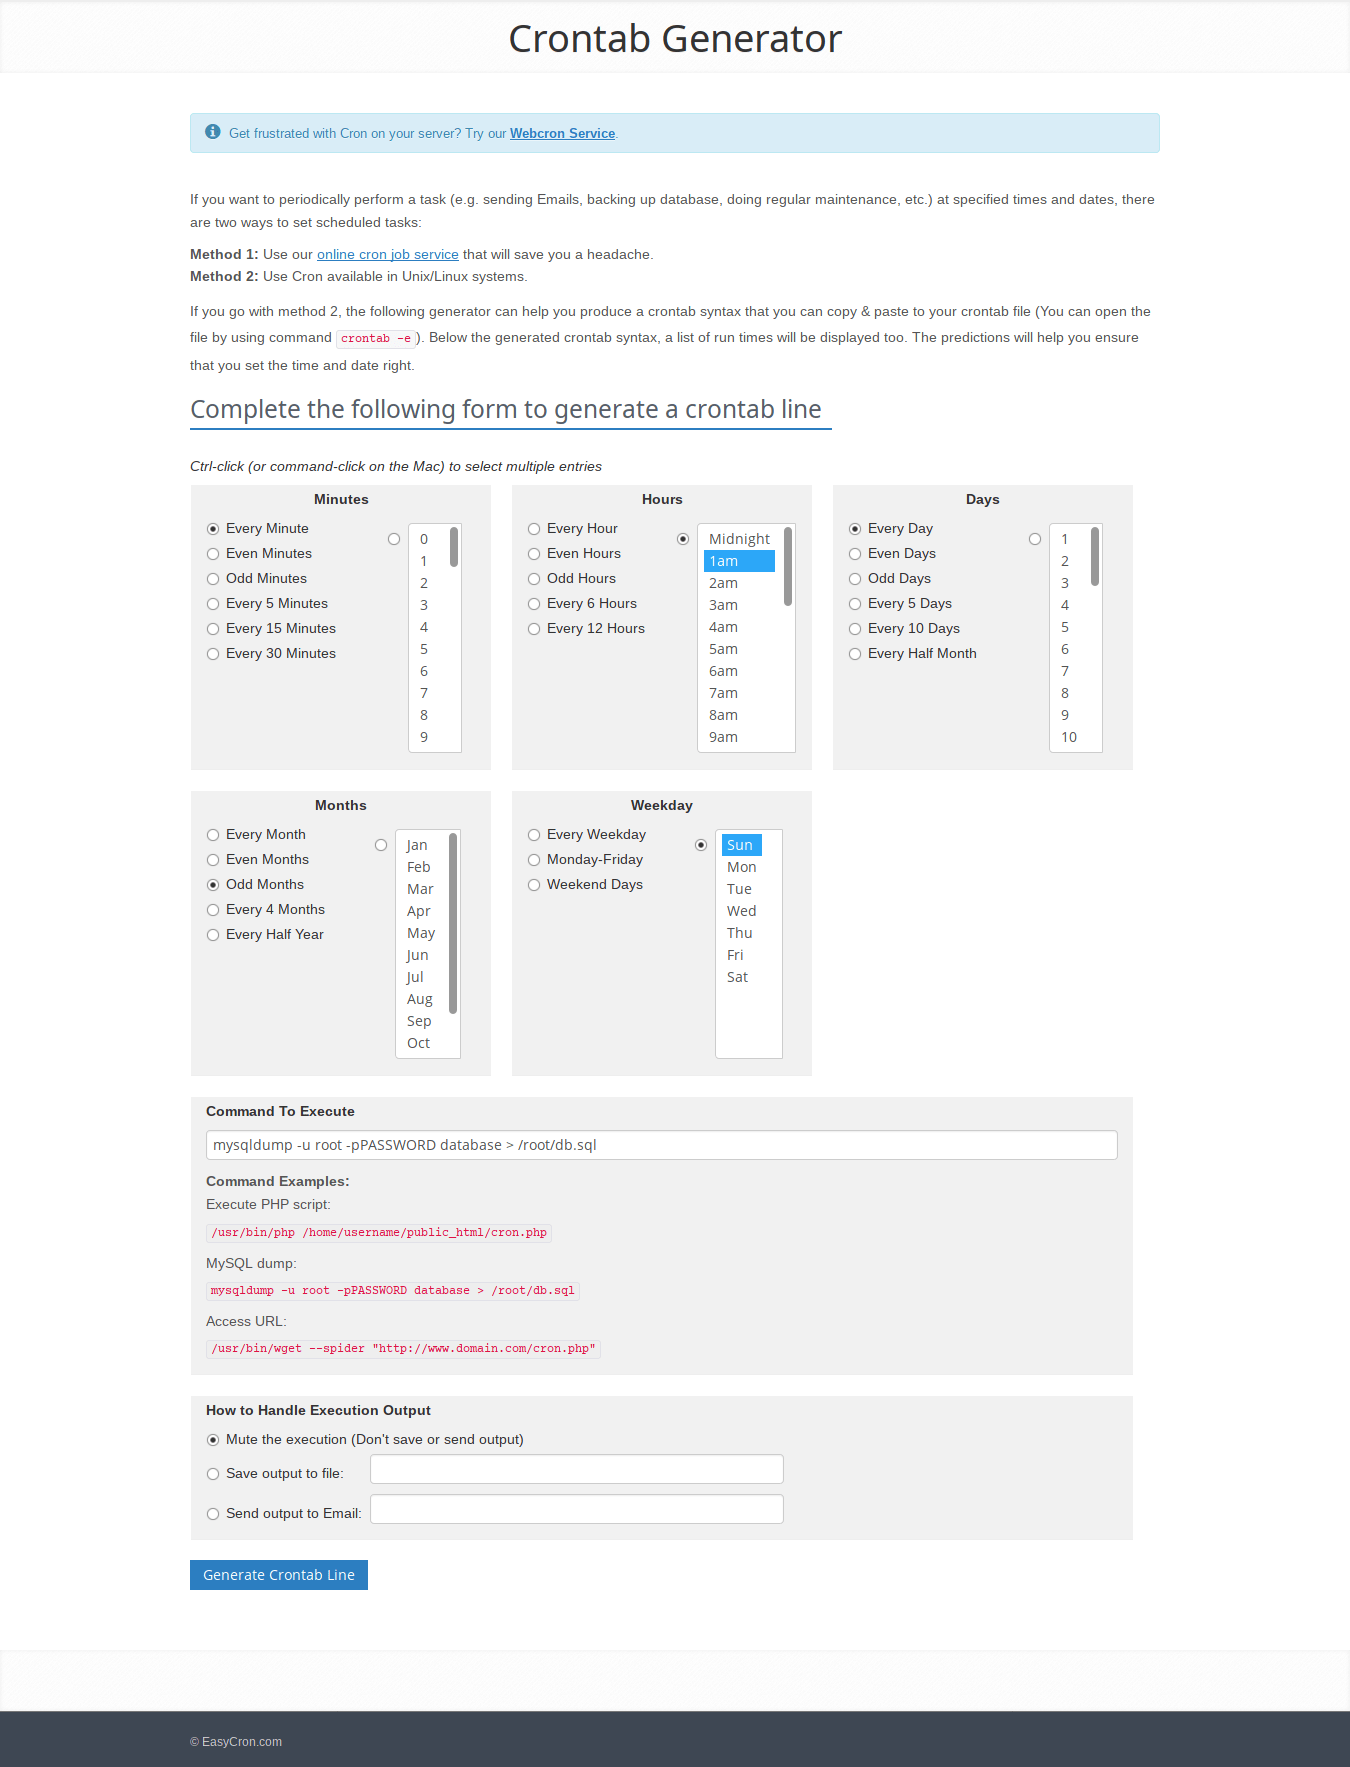
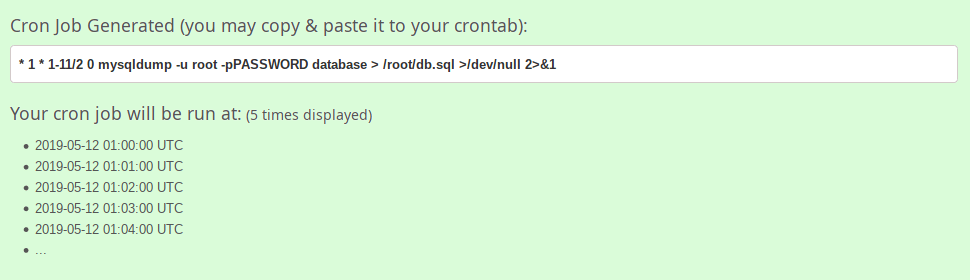
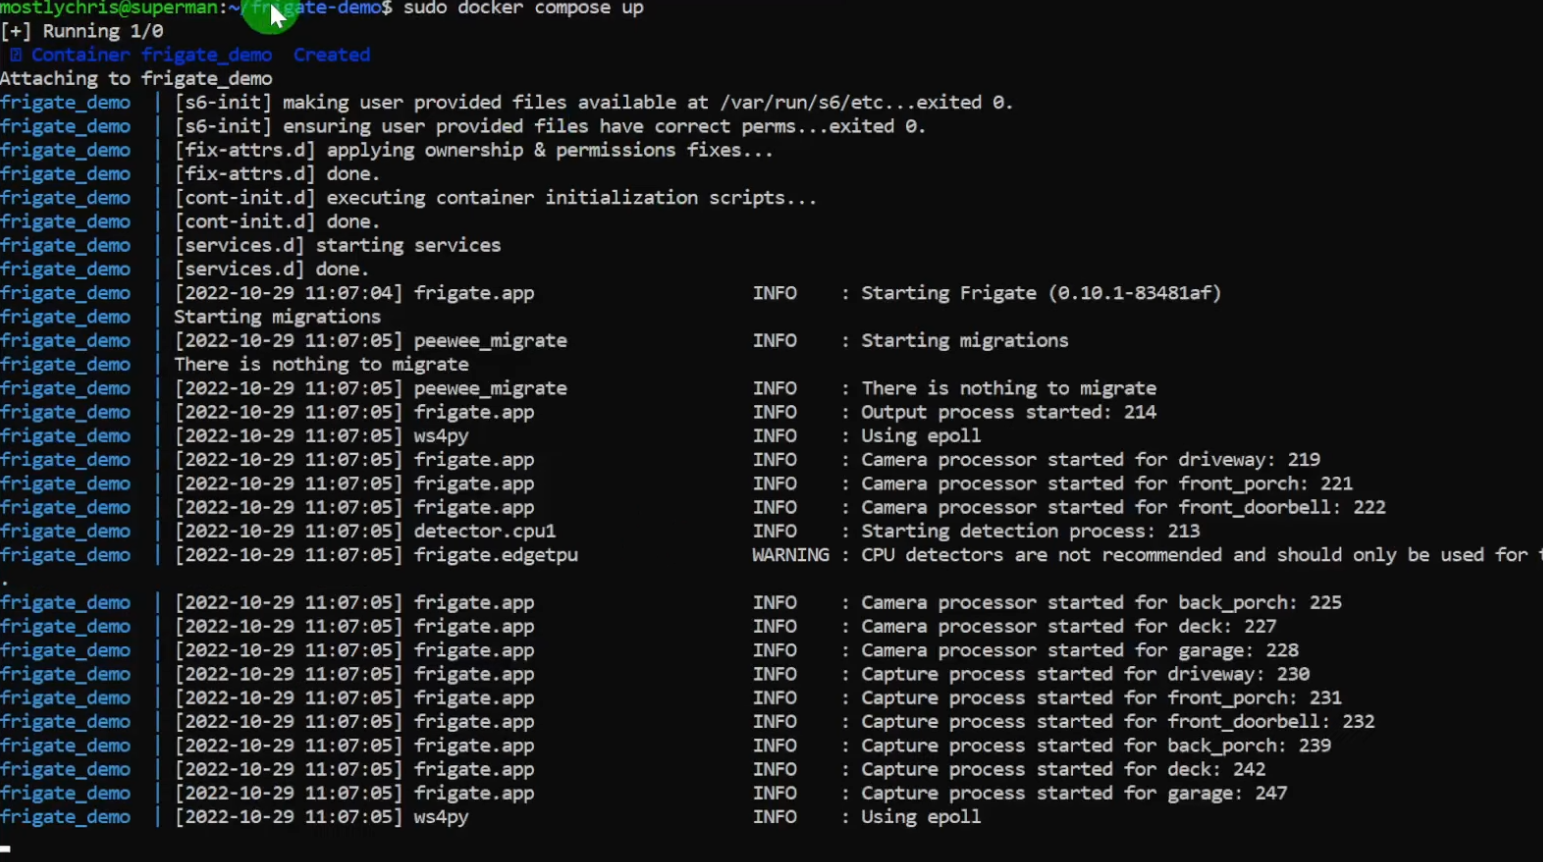
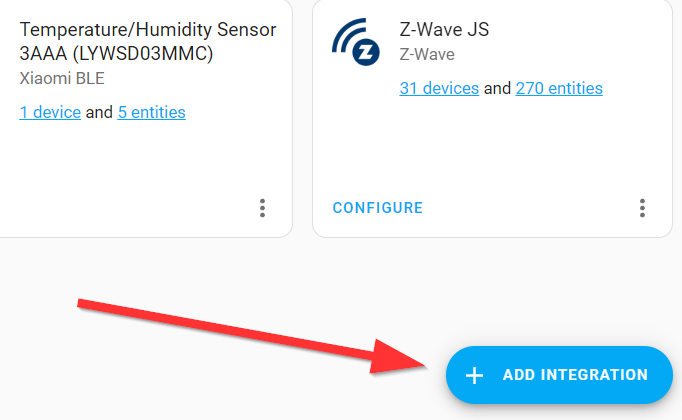
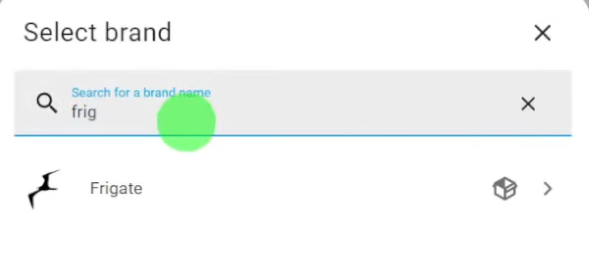
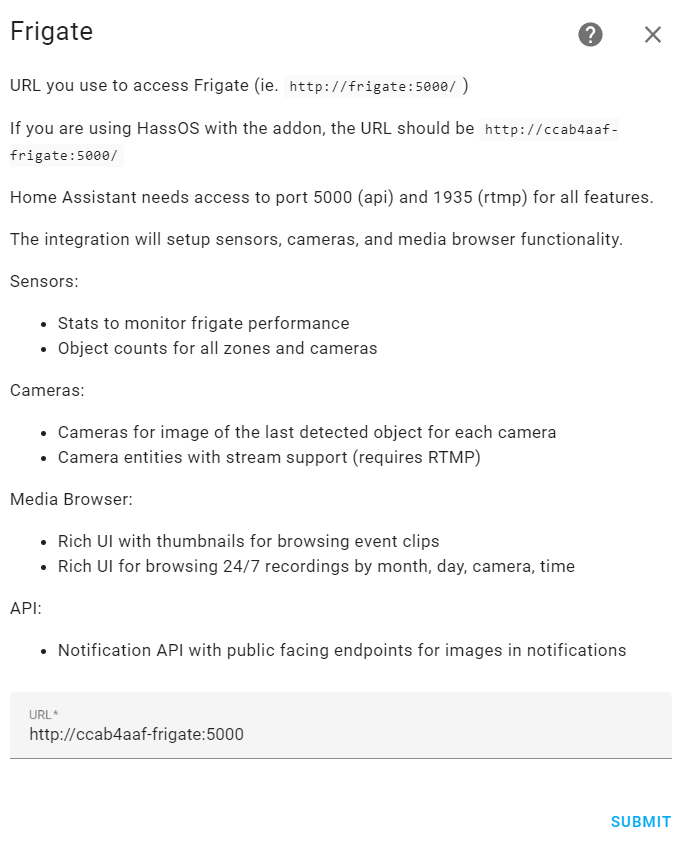
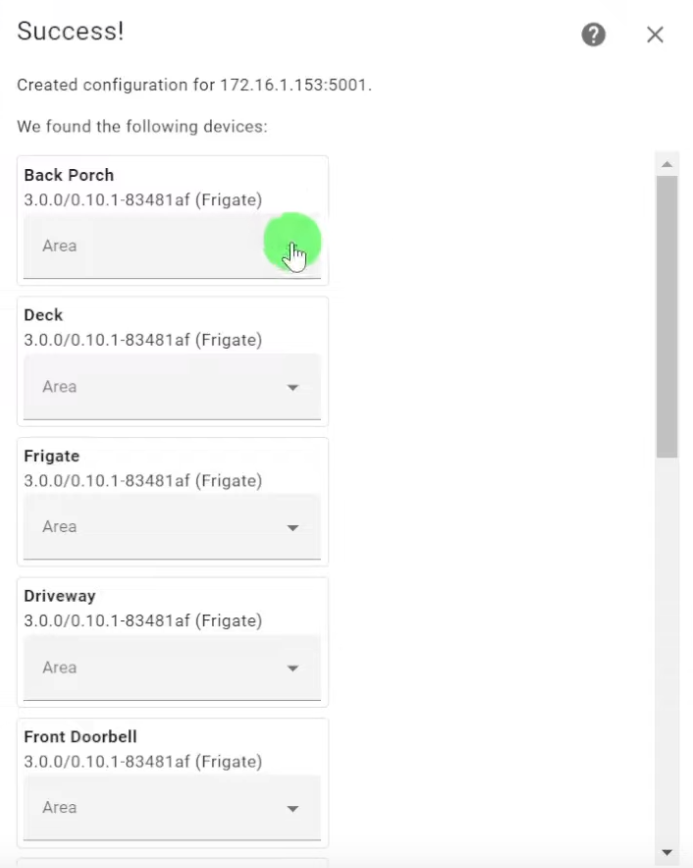
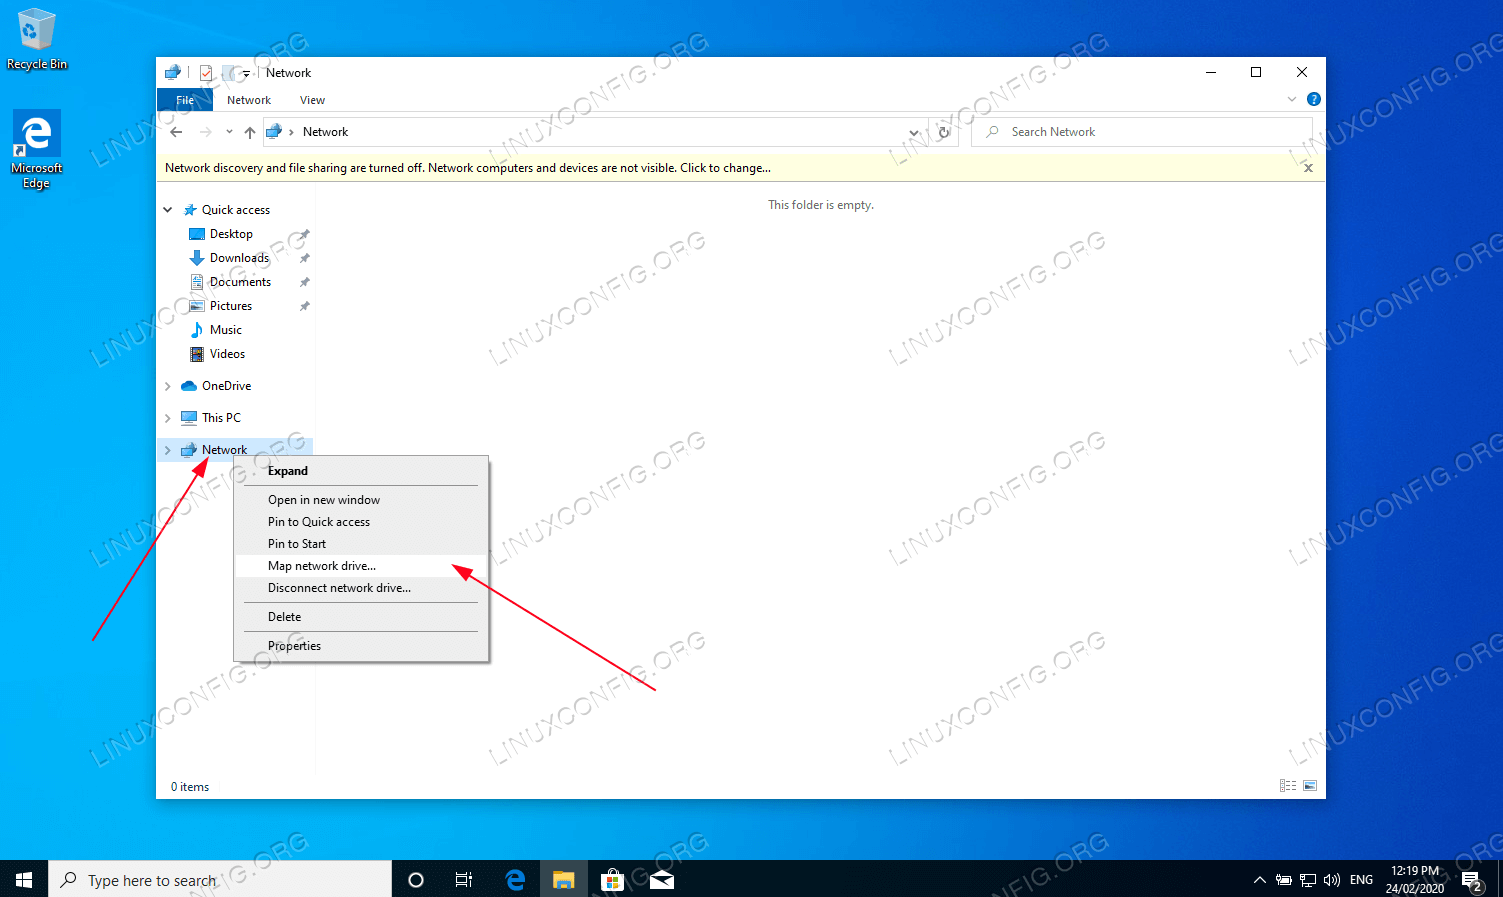
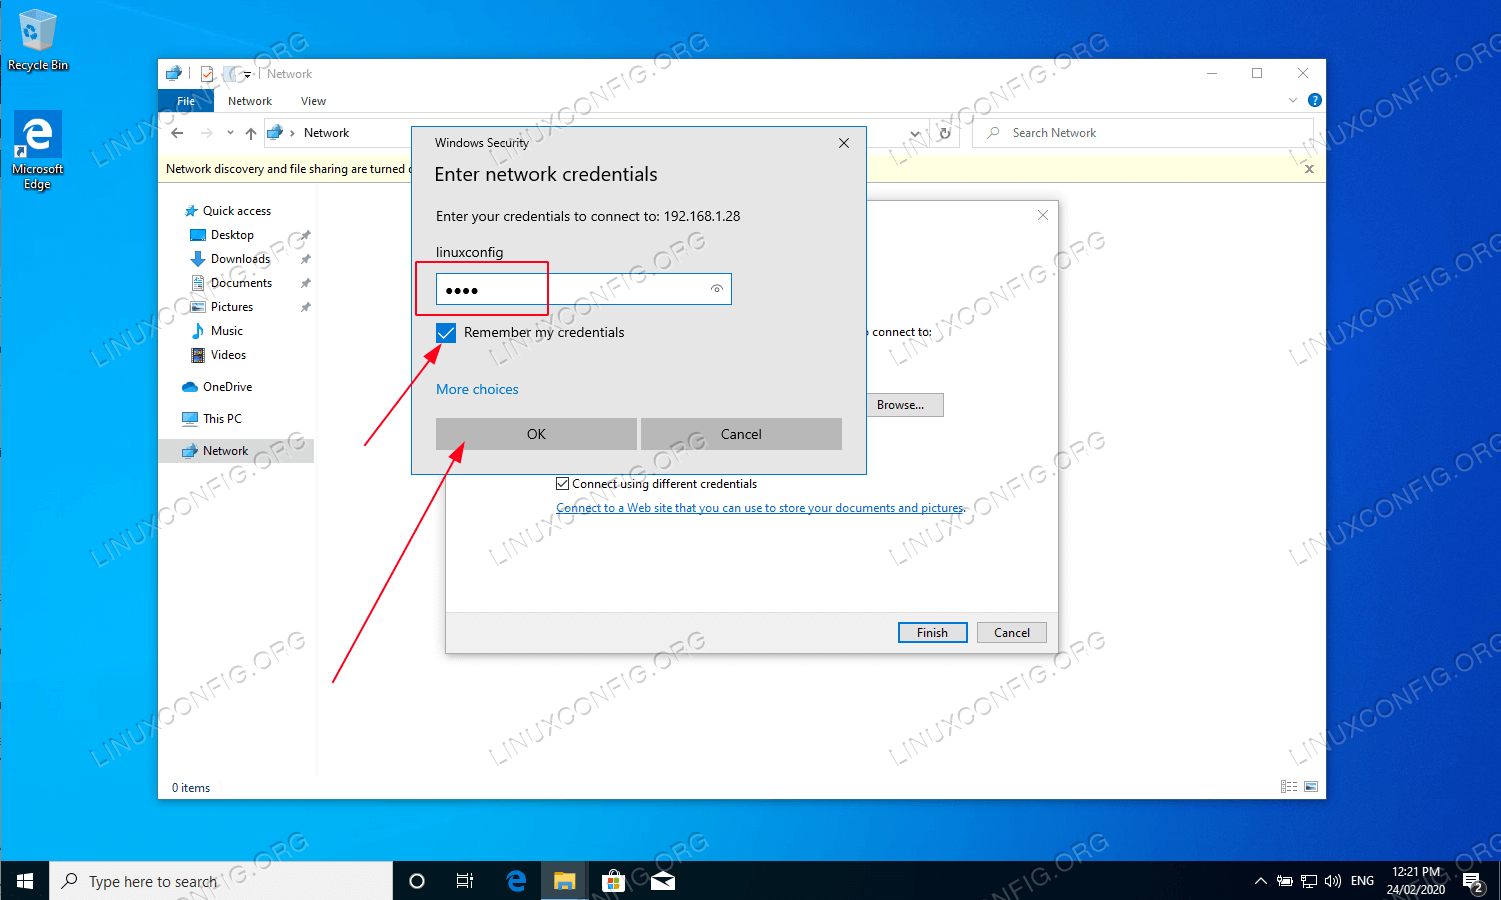
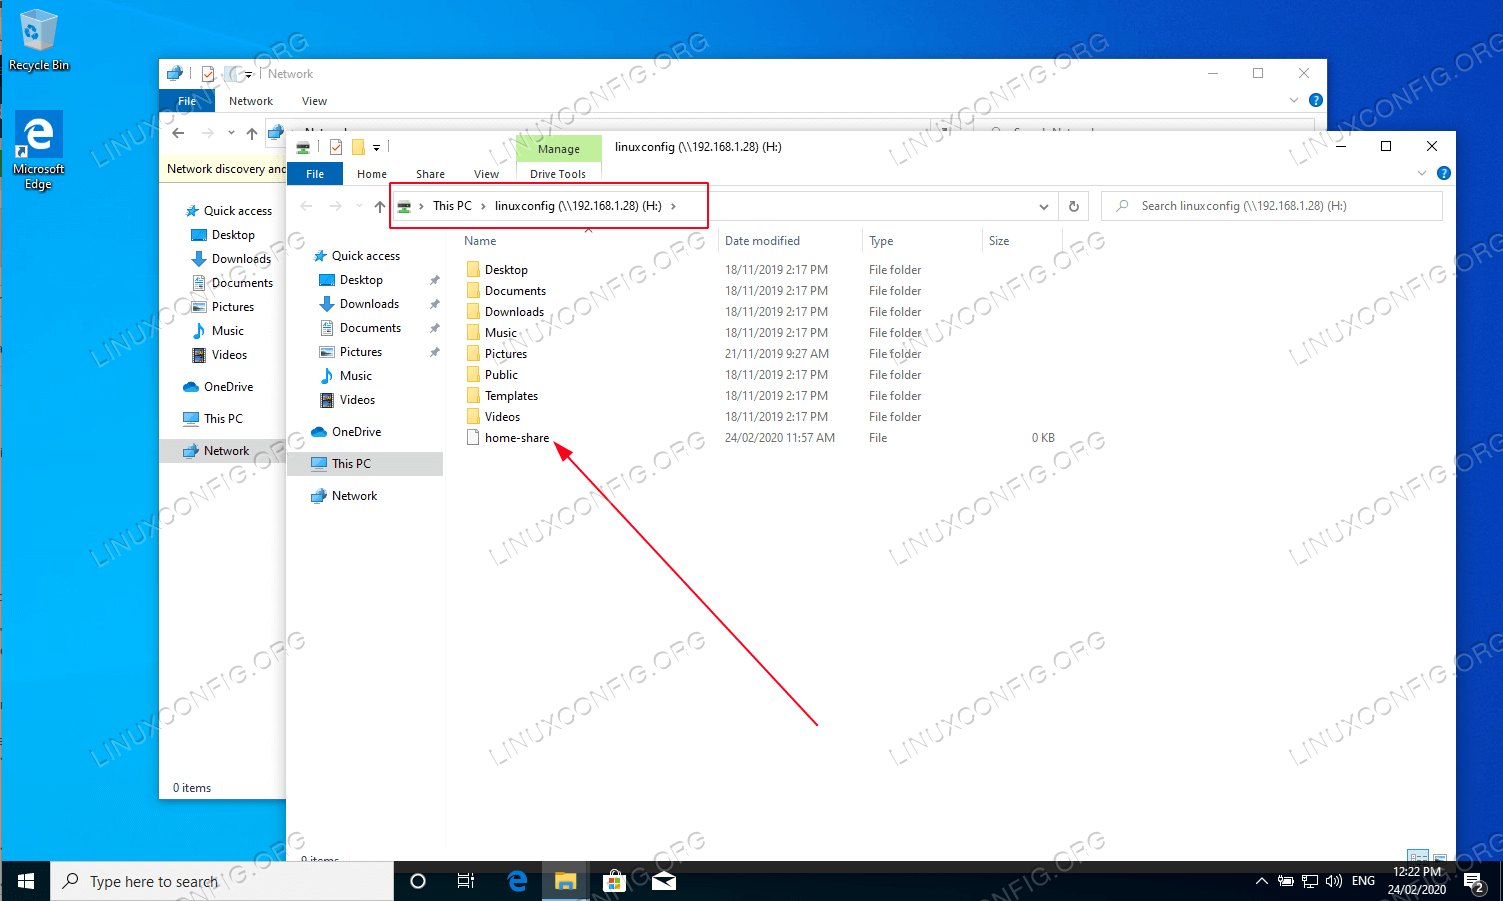
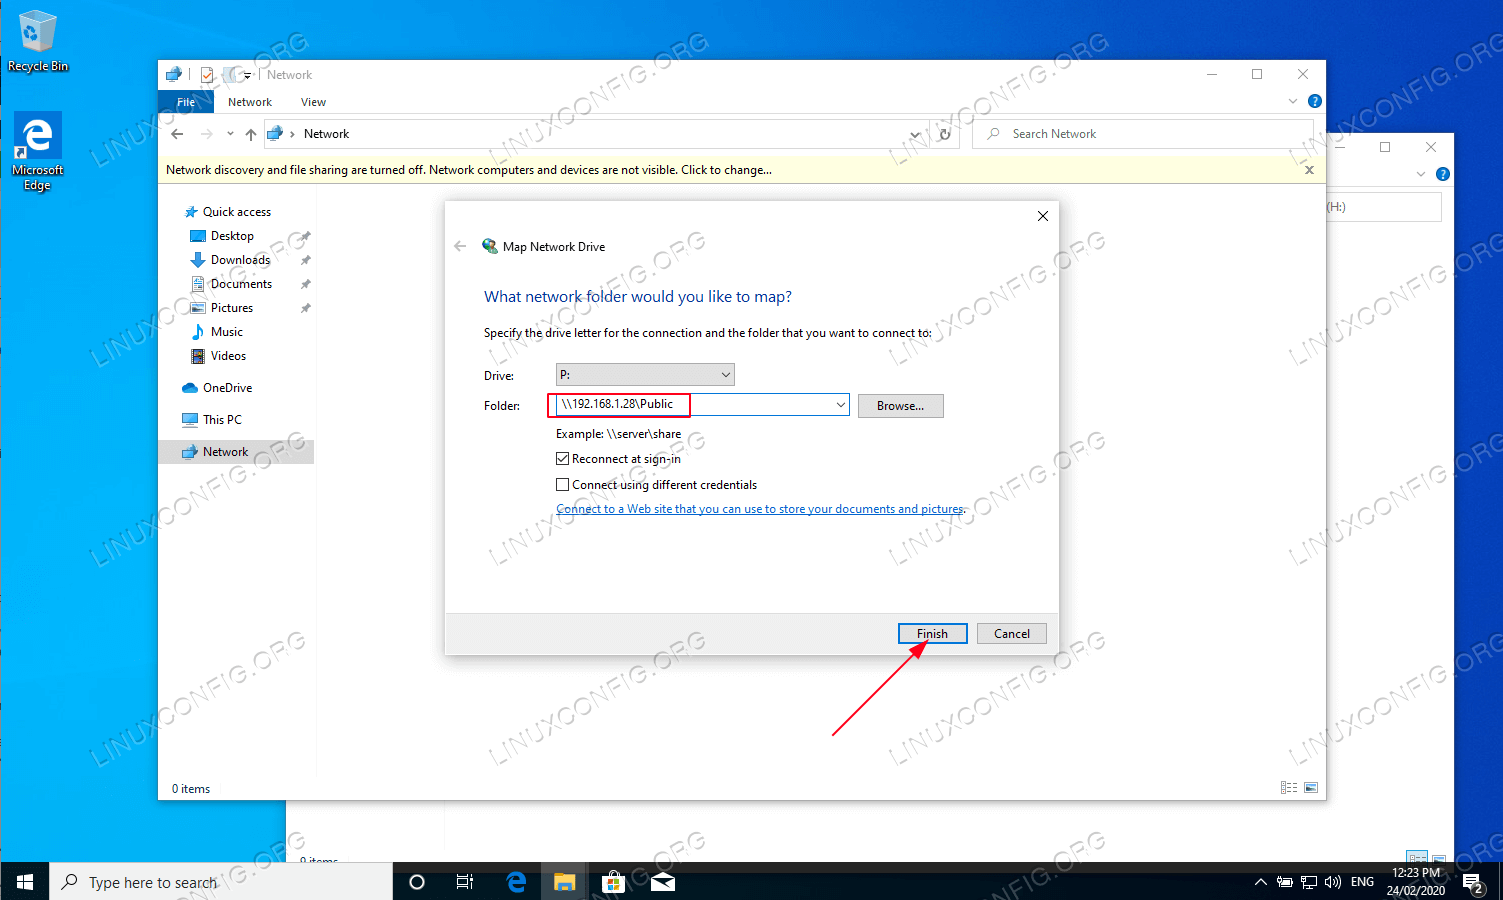
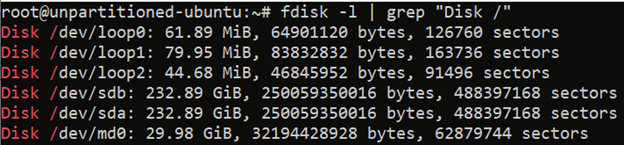
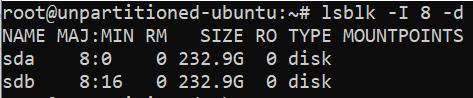
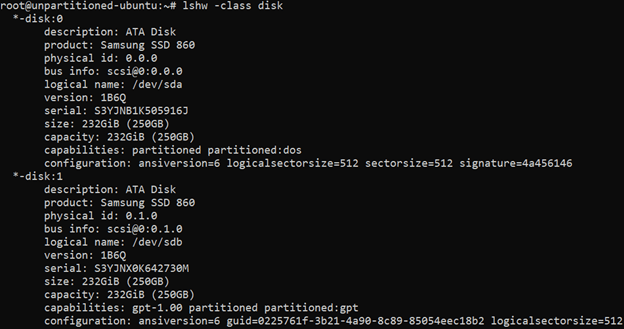
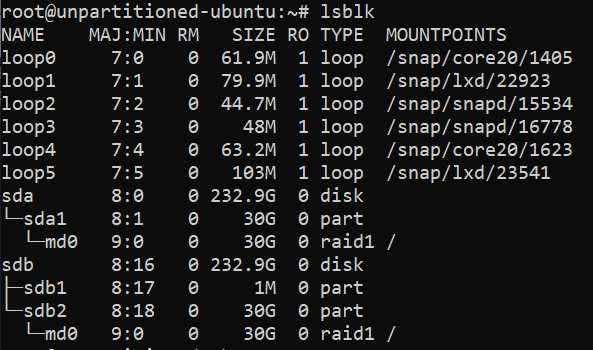
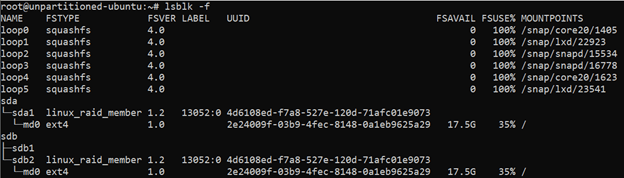
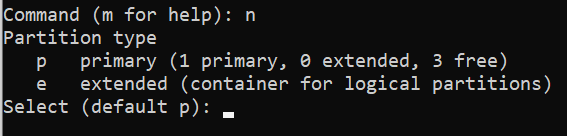
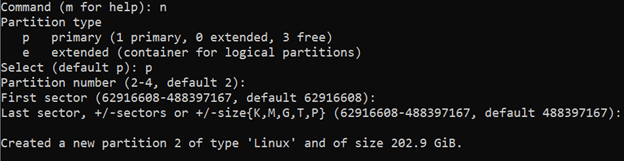
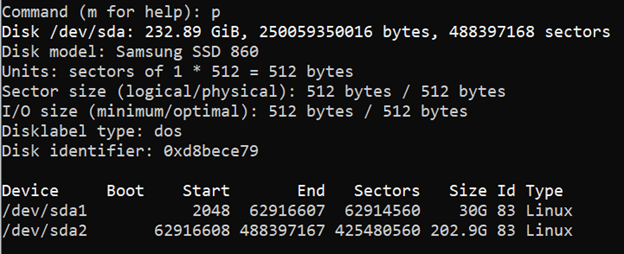
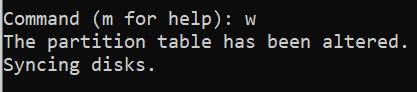
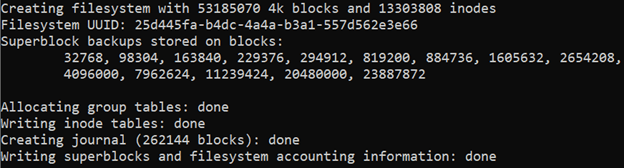
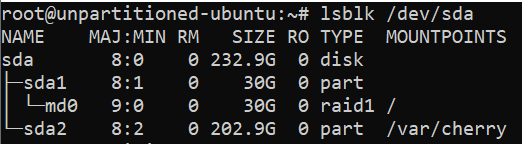
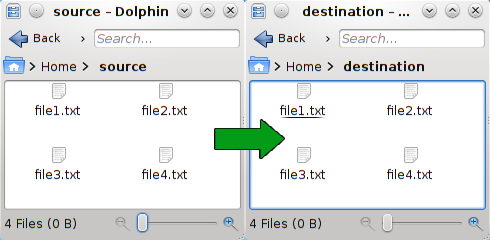
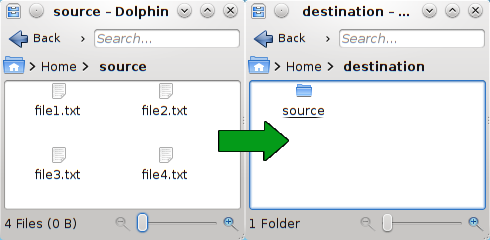